

A wise man once said: You can’t do a proper job without the proper tools. When it comes to engine blueprinting, there is no substitute for accuracy and that means you must have quality measurement tools. Once the clearances are set, then you’ll need a small but dedicated collection of assembly tools to do the job right. The challenge for young engine builders who are just getting started is that a collection of these tools will appear intimidating and seemingly impossibly expensive to assemble. The key is to make time and persistence work for you, one tool at a time.
In this first article of many to come in EngineLabs’ exclusive Blueprint Series, we’ll cover everything you can imagine pertaining to engine blueprinting—from the tools to the processes. Today, it’s about the tools which are a critical addition to any enthusiast’s toolbox. Read on…
Measuring Tools
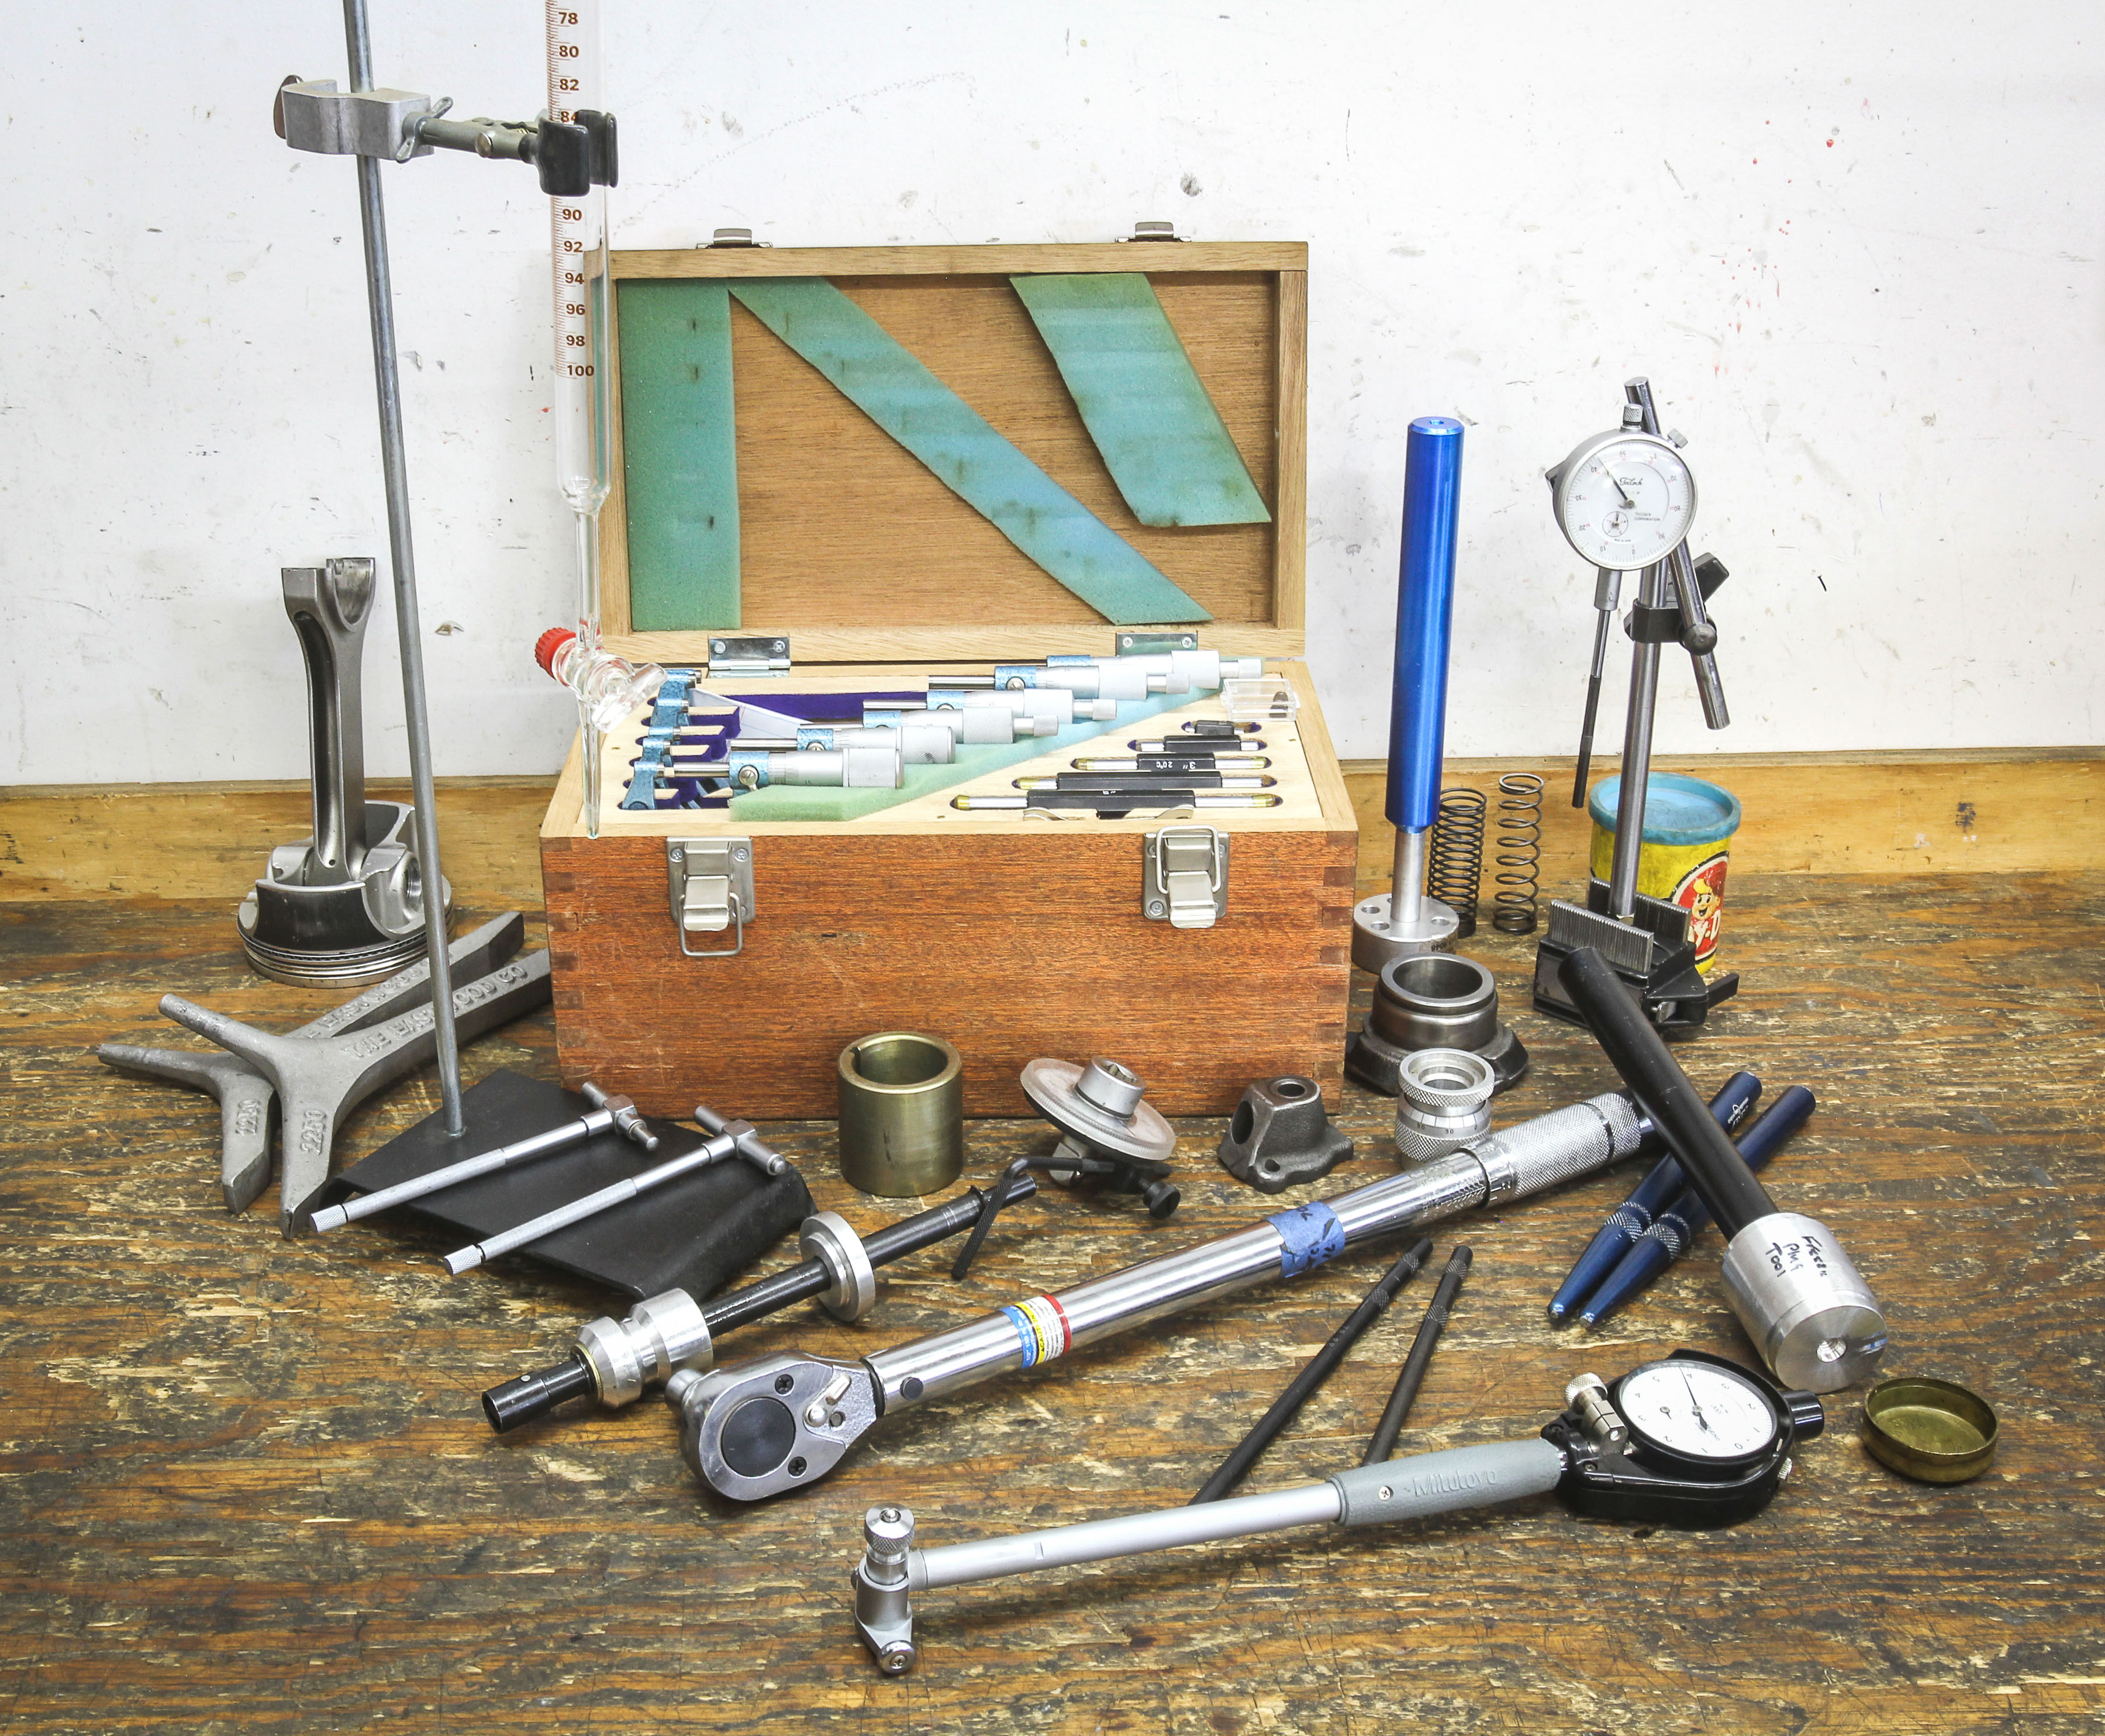
Let’s start with precision measurement tools and work our way into the engine assembly tools. If you’re just getting started, but plan to build multiple engines over the course of a lifetime of car building, then quality tools will always be the right choice. One of the first tools this author purchased was a six-inch dial caliper. In the mid ‘70s, this cost $100—which is equal to about $450 in 21st-century dollars. It has paid me back with reliable service many times over; I still have the caliper and it works like a champ.
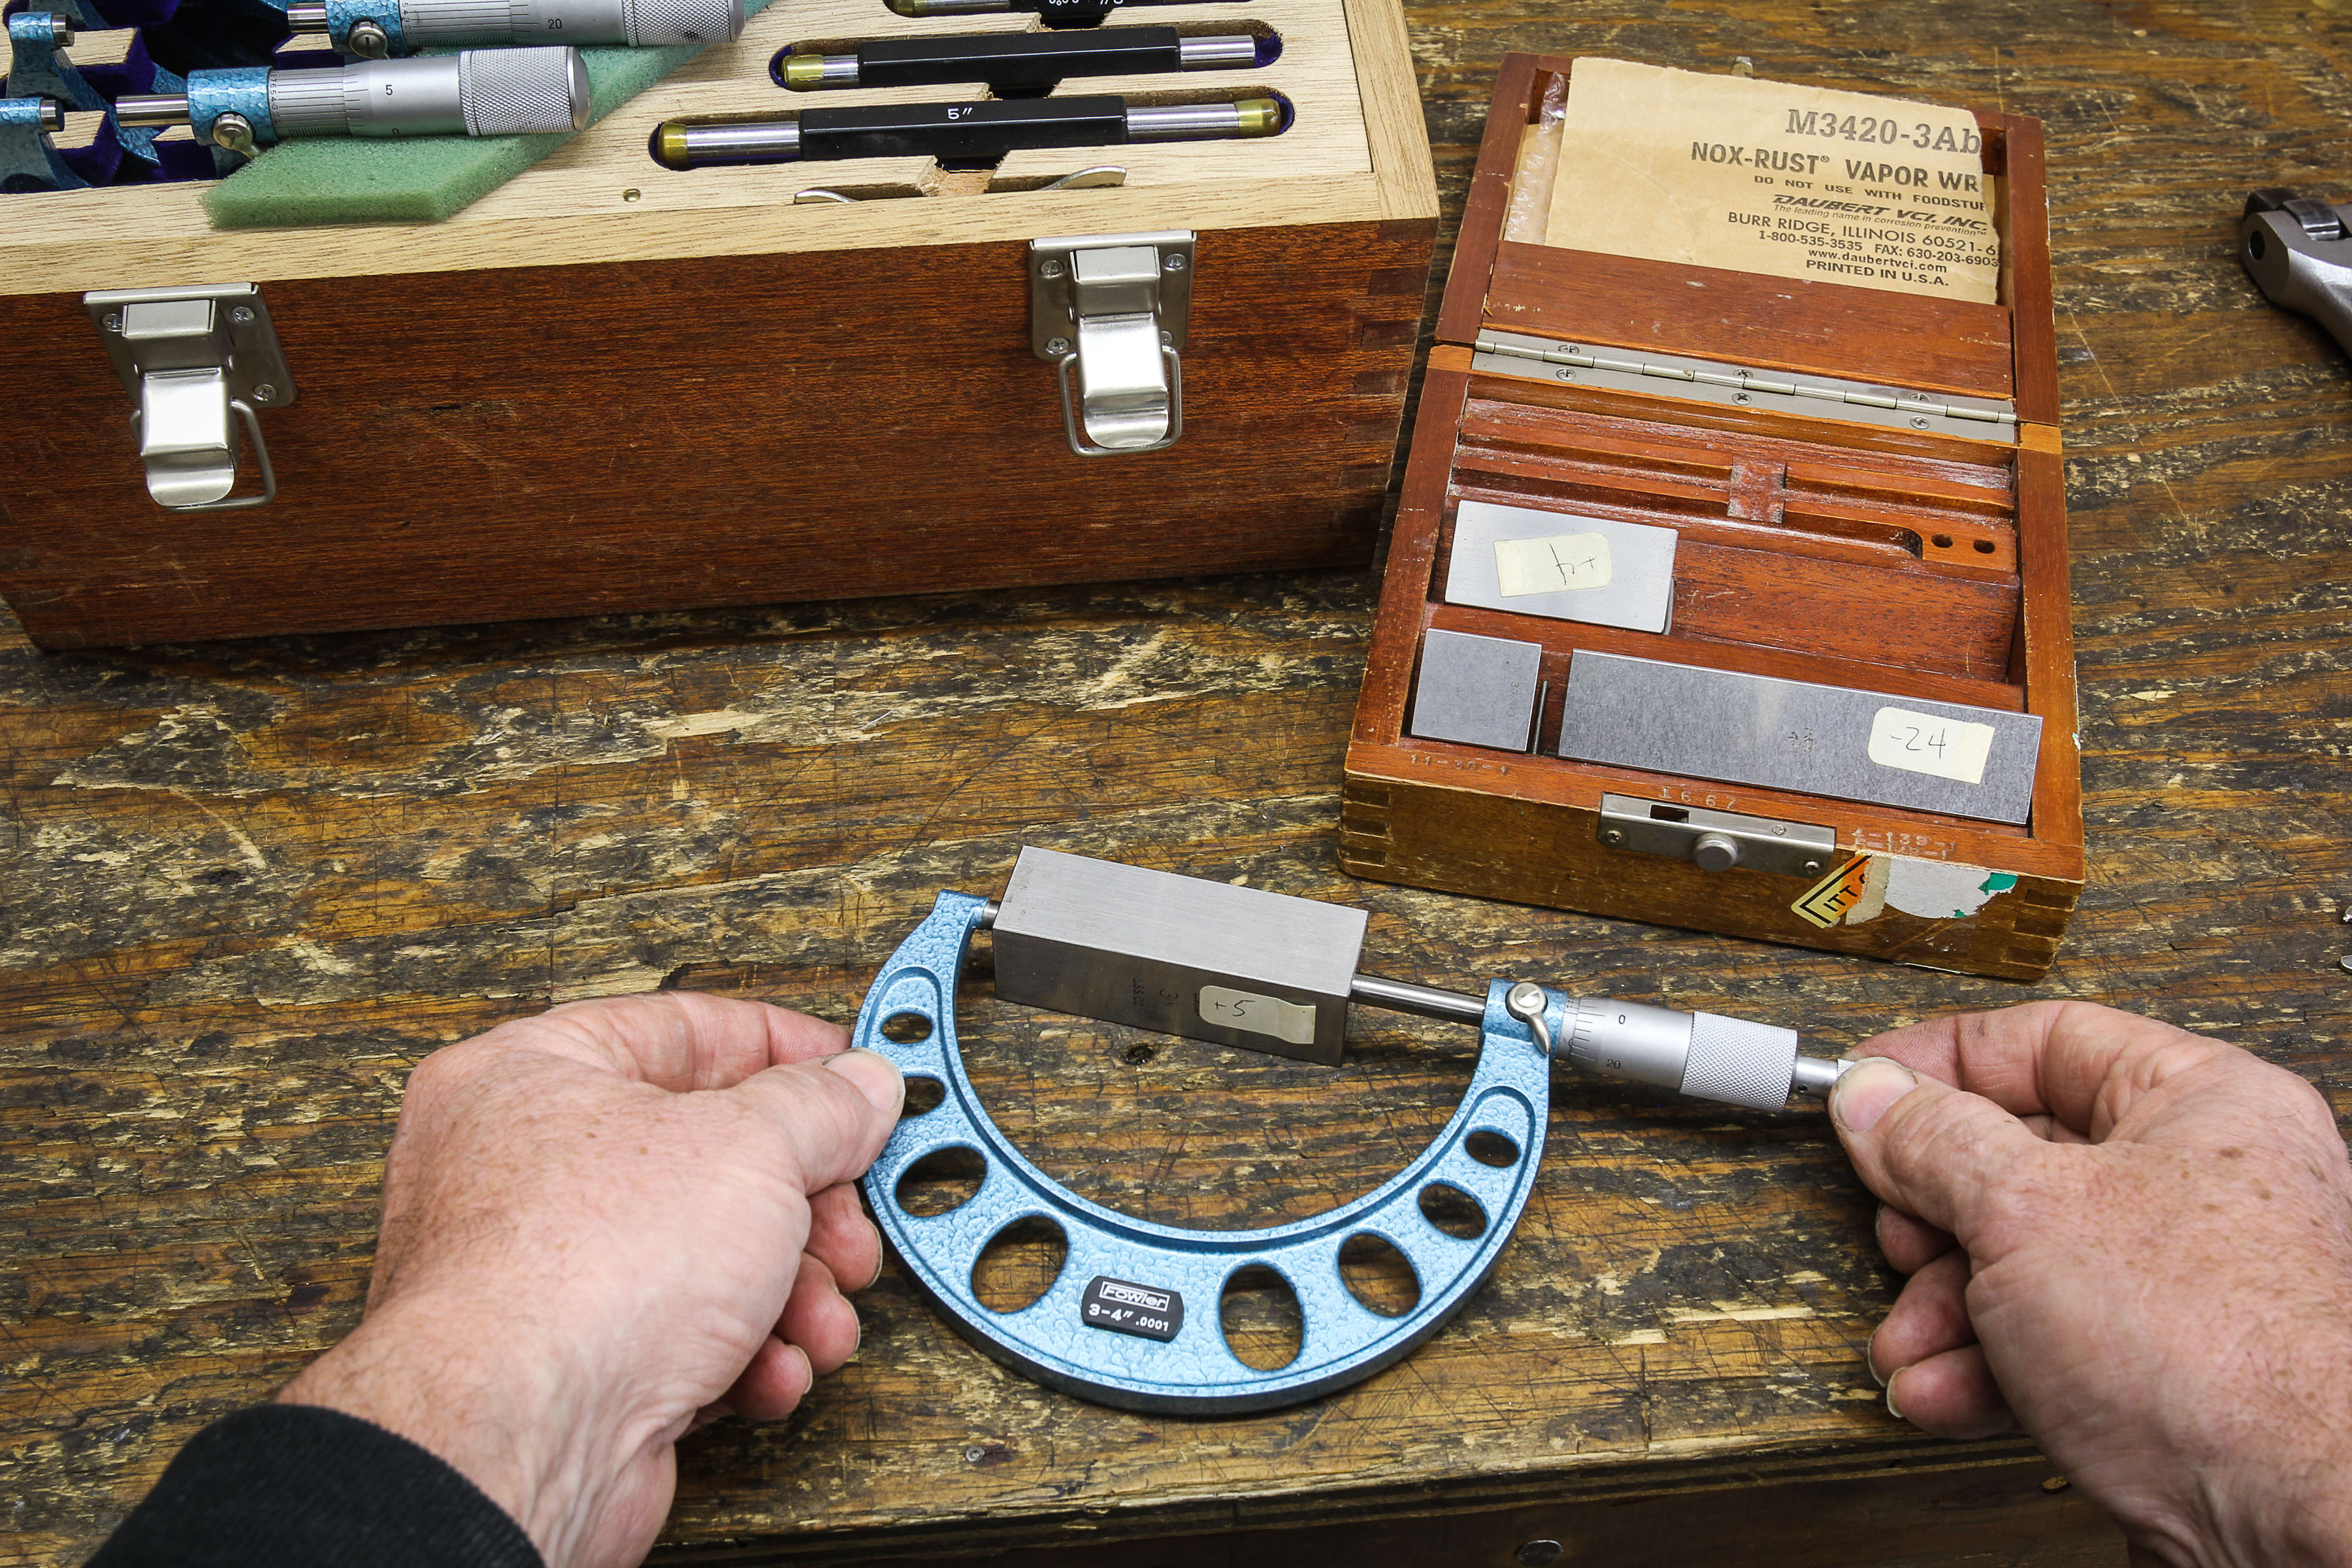
Perhaps the most oft-used measuring tools will be a set of outside micrometers. The great thing about starting now is that the quality versus price quotient has certainly improved over tools available to previous generations. Companies like Starrett, Mitutoyo, Fowler, and others produce a good product for a reasonable price. You can expect to spend a minimum of $500 to $750 for a set of four or perhaps six outside micrometers. The minimum set required for engine building would be in ranges of 0 to 1, 1 to 2, 2 to 3, and 3 to 4-inch increments.

A set of outside micrometers are required equipment for the serious engine builder. Plastigage has no business in the same tool box as a quality set of micrometers. Since accuracy is king, the ones to look for will offer accuracy to 0.0001-inch.
Look for a micrometer set that includes a box for protection. Treat these tools like they are made of porcelain, and they will last forever. The only micrometers worth considering must be able to measure to 0.0001-inch (that’s ten-thousandths of an inch). Do not consider ones that only measure to 0.001-inch as this accuracy is insufficient for engine building purposes. Human hair is roughly 0.002 to 0.006-inch and we need to be able to measure far more accurately than that. Engine building accuracy hinges upon the working within a reasonable tolerance of +/- 0.0001-inch.

If you are serious about measurement accuracy, we’ve discovered that the included standards with a micrometer set can be less than precise. We discovered this after purchasing a set of gauge blocks guaranteed to be accurate to under ten-millionths of an inch (that’s 0.0000010-inch). We performed this test recently on our Fowler micrometer standards and discovered that the original 2-inch standard was off by 0.0001-inch. This certainly isn’t a huge deal, but if you really care about accuracy, a set of quality gauge blocks might soften any anxiety over accuracy.
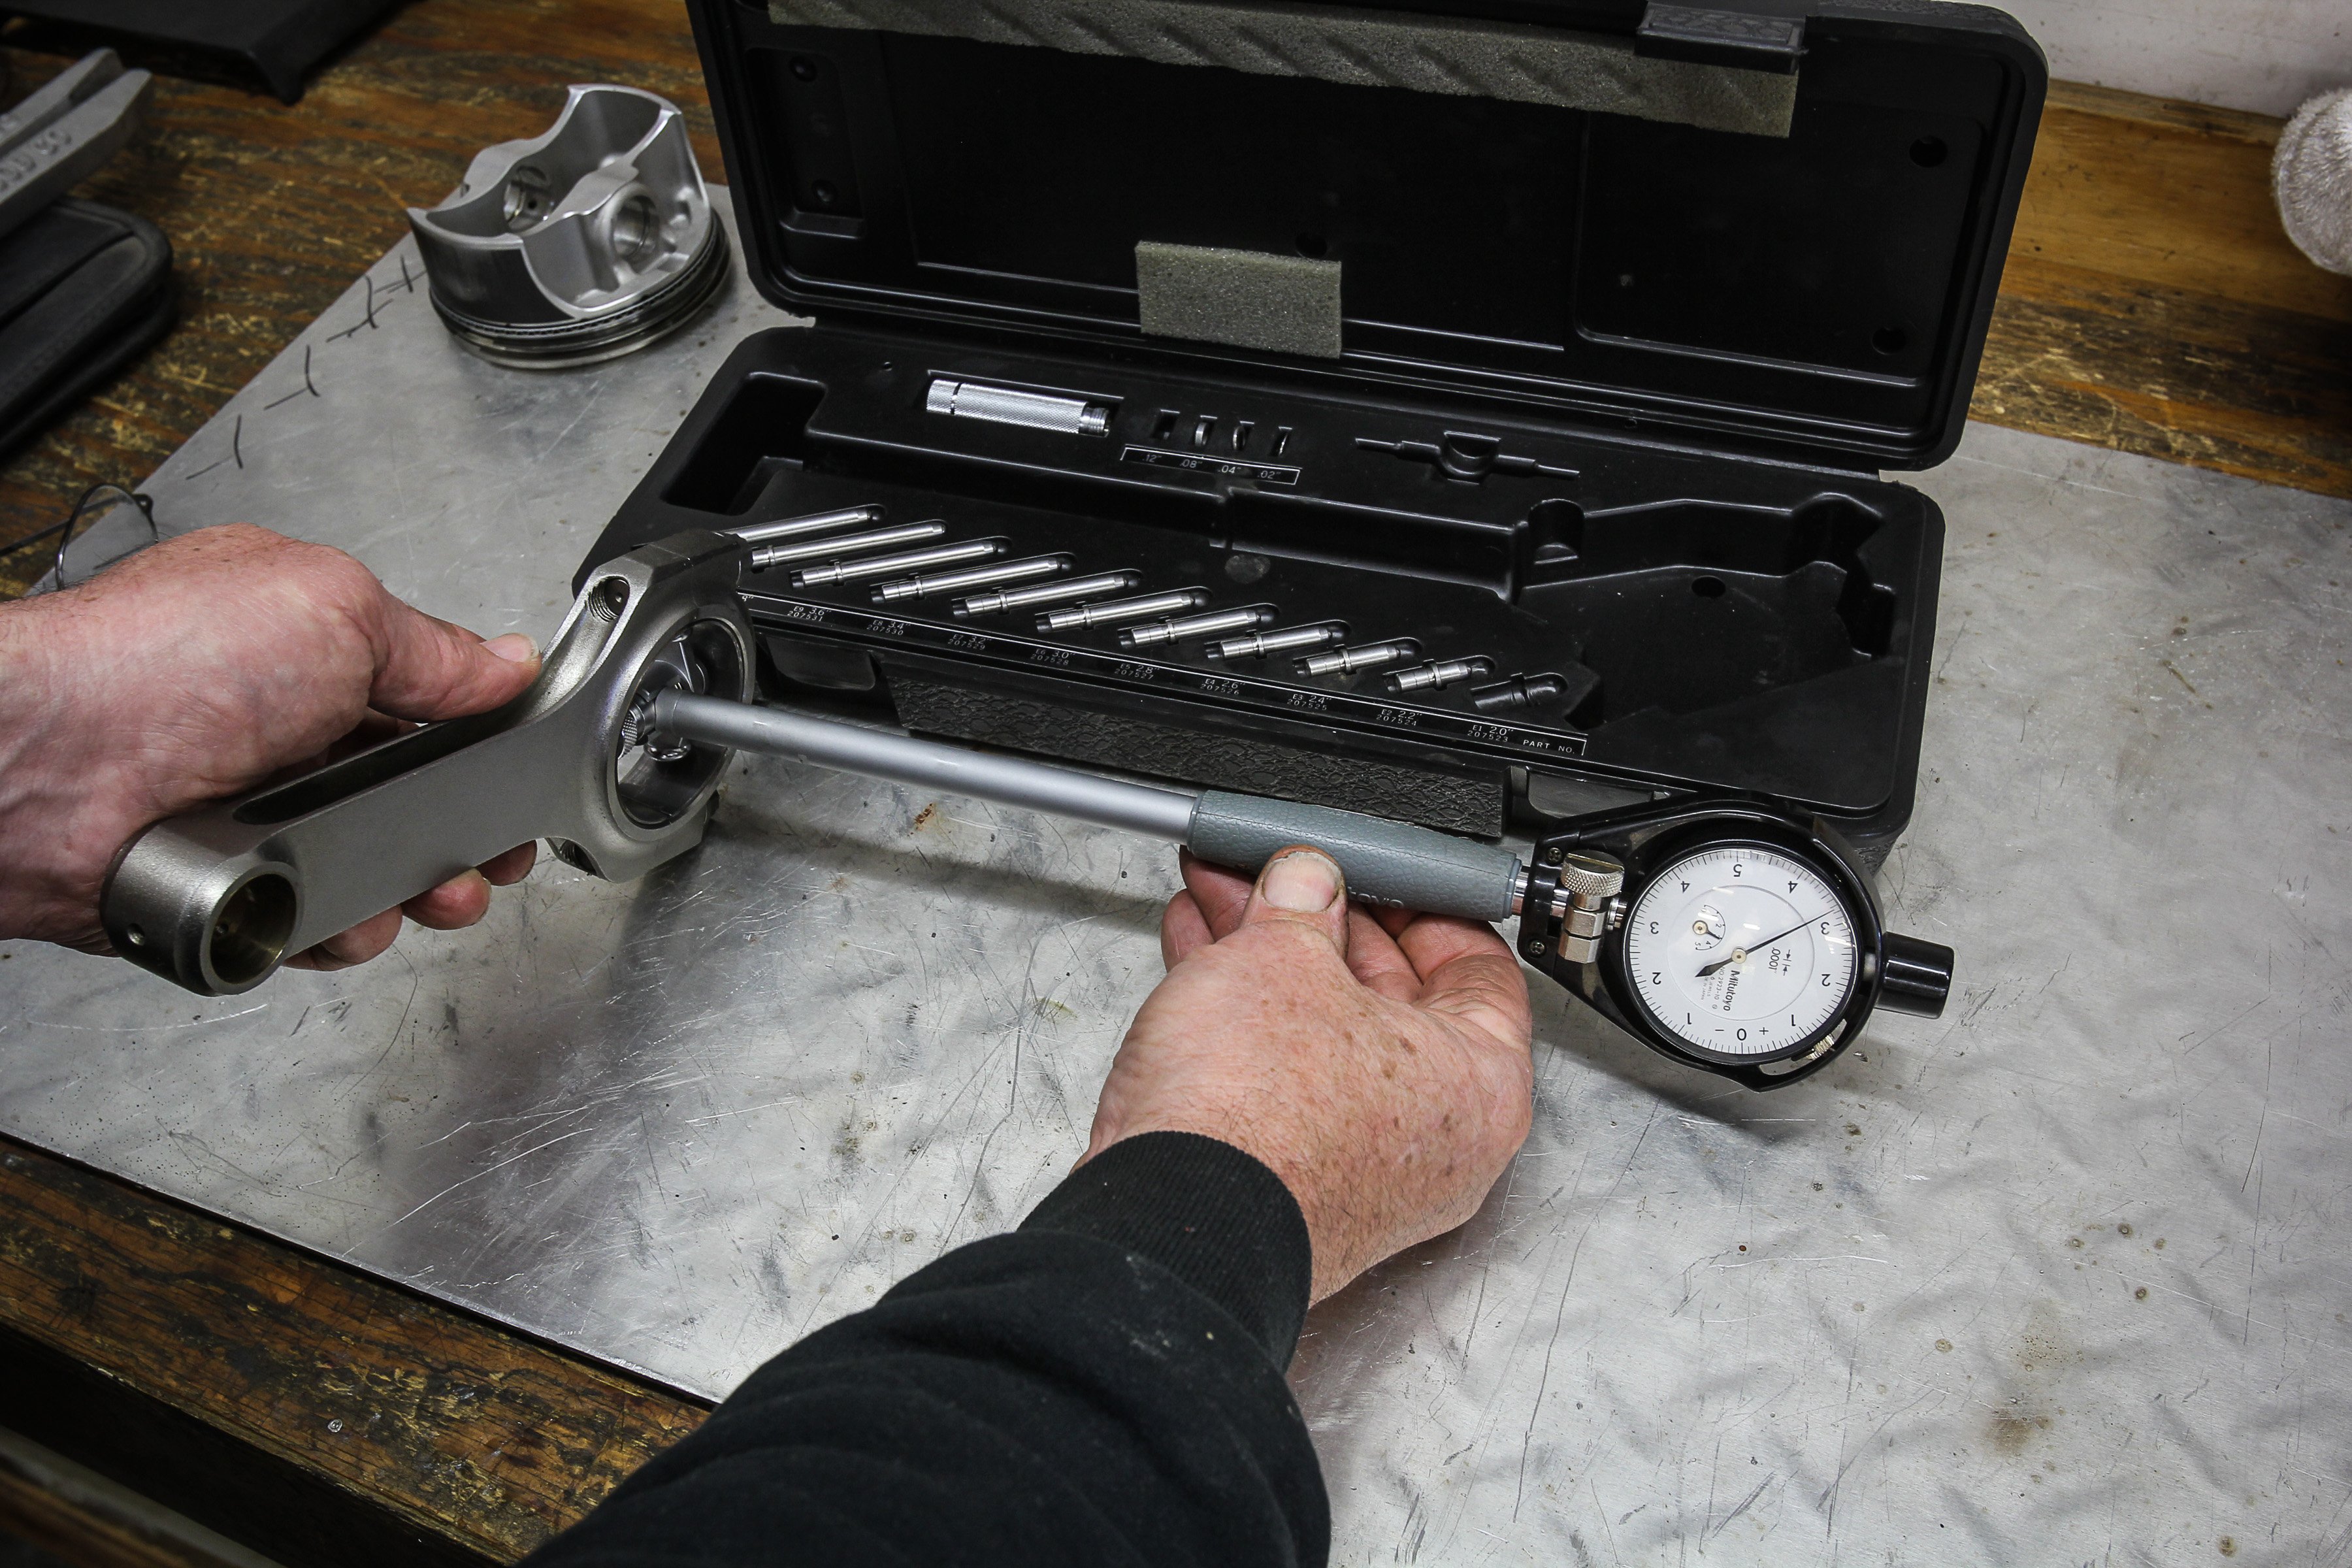
You can spend a ton of money on a dial bore gauge, but a little time spent shopping should offer affordable accuracy to 0.0001-inch with a measurement range from 2 to 6 inches.
A dial bore gauge is another must-have tool for your engine build repertoire. This tool offers the means to accurately measure the inside diameters of connecting rod and main bearings. Spending the extra coin on a gauge with a range of 2 to 6 inches and one with graduations accurate to 0.0001-inch is a worthwhile investment. There are also 0.0005-inch graduation dials, so be aware if you are using someone else’s gauge. The most popular automotive gauges are ones with a two-point placement that use a pair of small wheels to help position the spindle.
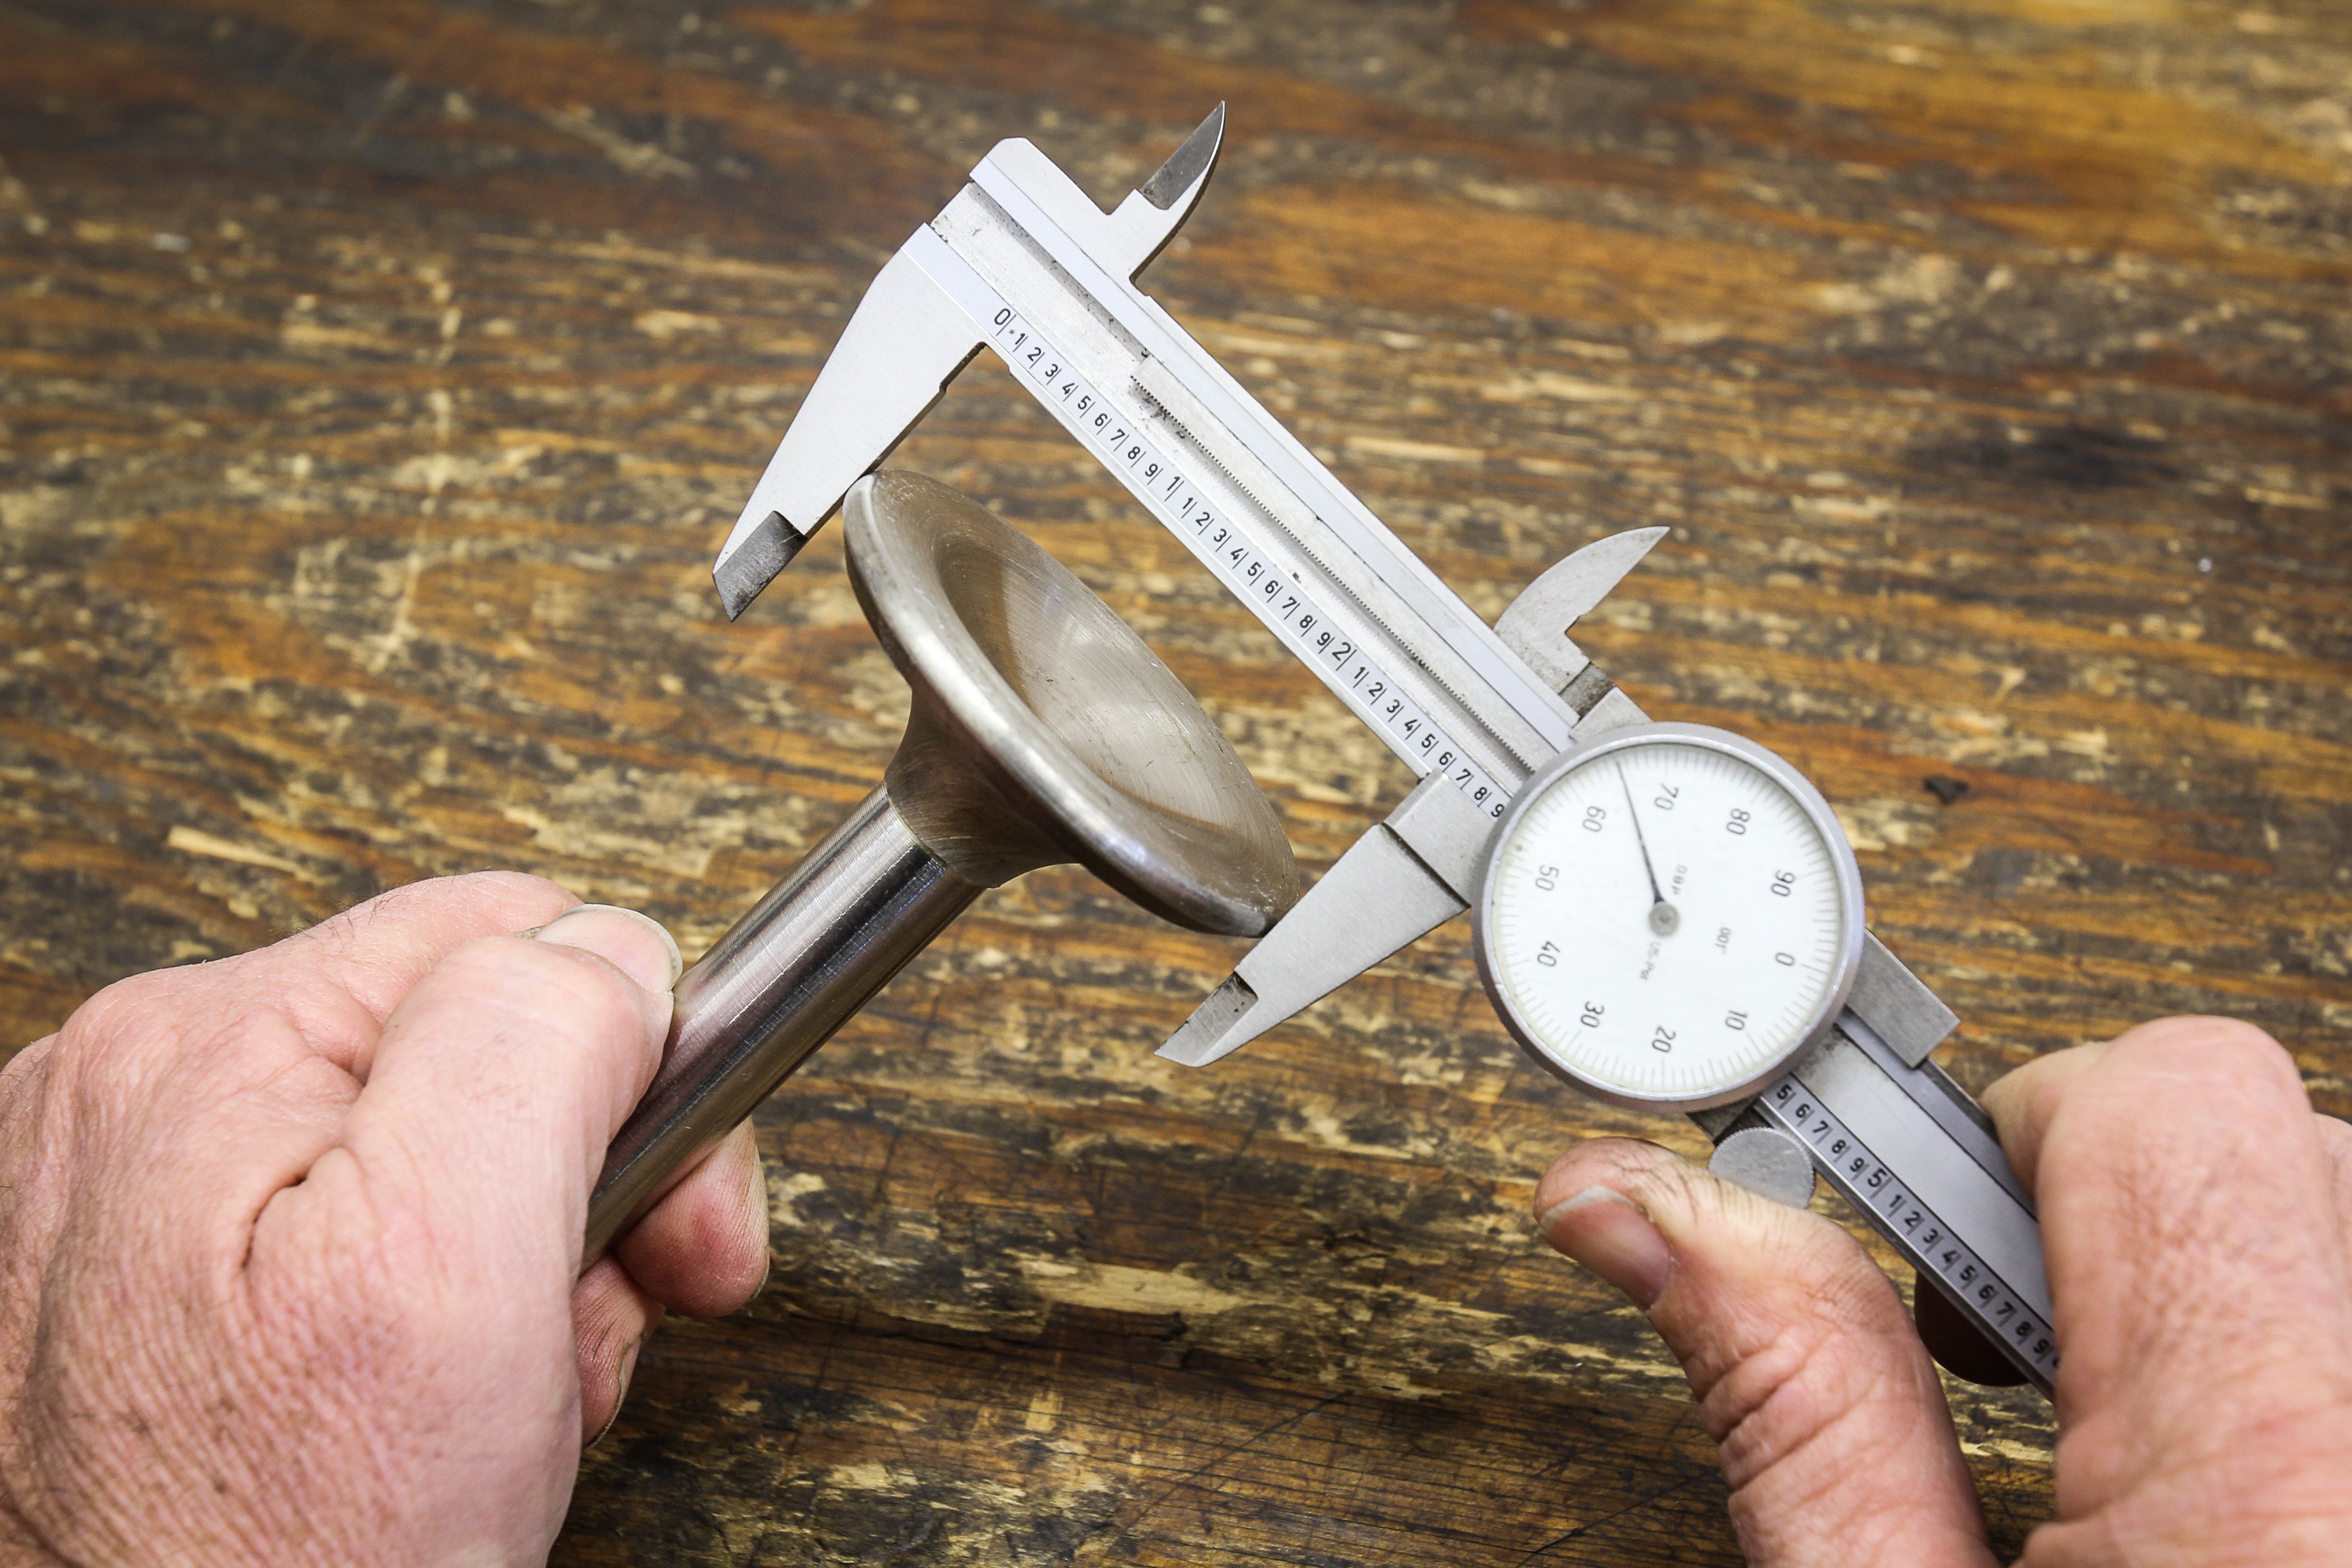
For quick diameter checks, your tool box should have at least one dial caliper and likely several. Digital units are nice but aggravating when the battery dies. Digital does offer advantages, though, where you can zero the opening anywhere in the scale for quick diameter comparisons. That monster valve we’re measuring is out of a Pratt & Whitney WWII radial aircraft engine. Dial indicators are a similar tool, but are far more widely used during the engine building process. They can be used for measuring things like crank endplay, roller cam endplay, piston deck height, cam lobe or valve lift, crankshaft runout, and many other items. If you find yourself building more than a few engines, you may discover an advantage to having multiple dial indicators set up to perform specific jobs, such as measuring piston deck height.

A rod vise is a must-have item. In a pinch you can use aluminum jaw inserts in your steel vise but that’s clumsy. We’ve had this vise for decades and use it every time we check bearing clearance.
Combined with the requirement for a dial indicator is the need for a handy magnetic base. Another version of the dial indicator base is the flexible mount that can be bolted to a location and then easily manipulated to place the dial indicator in the exact required position. We’ve even found the need for homemade tools such as a long, steel plate drilled to bolt to an aluminum head to mount a magnetic base for measuring valve lift.
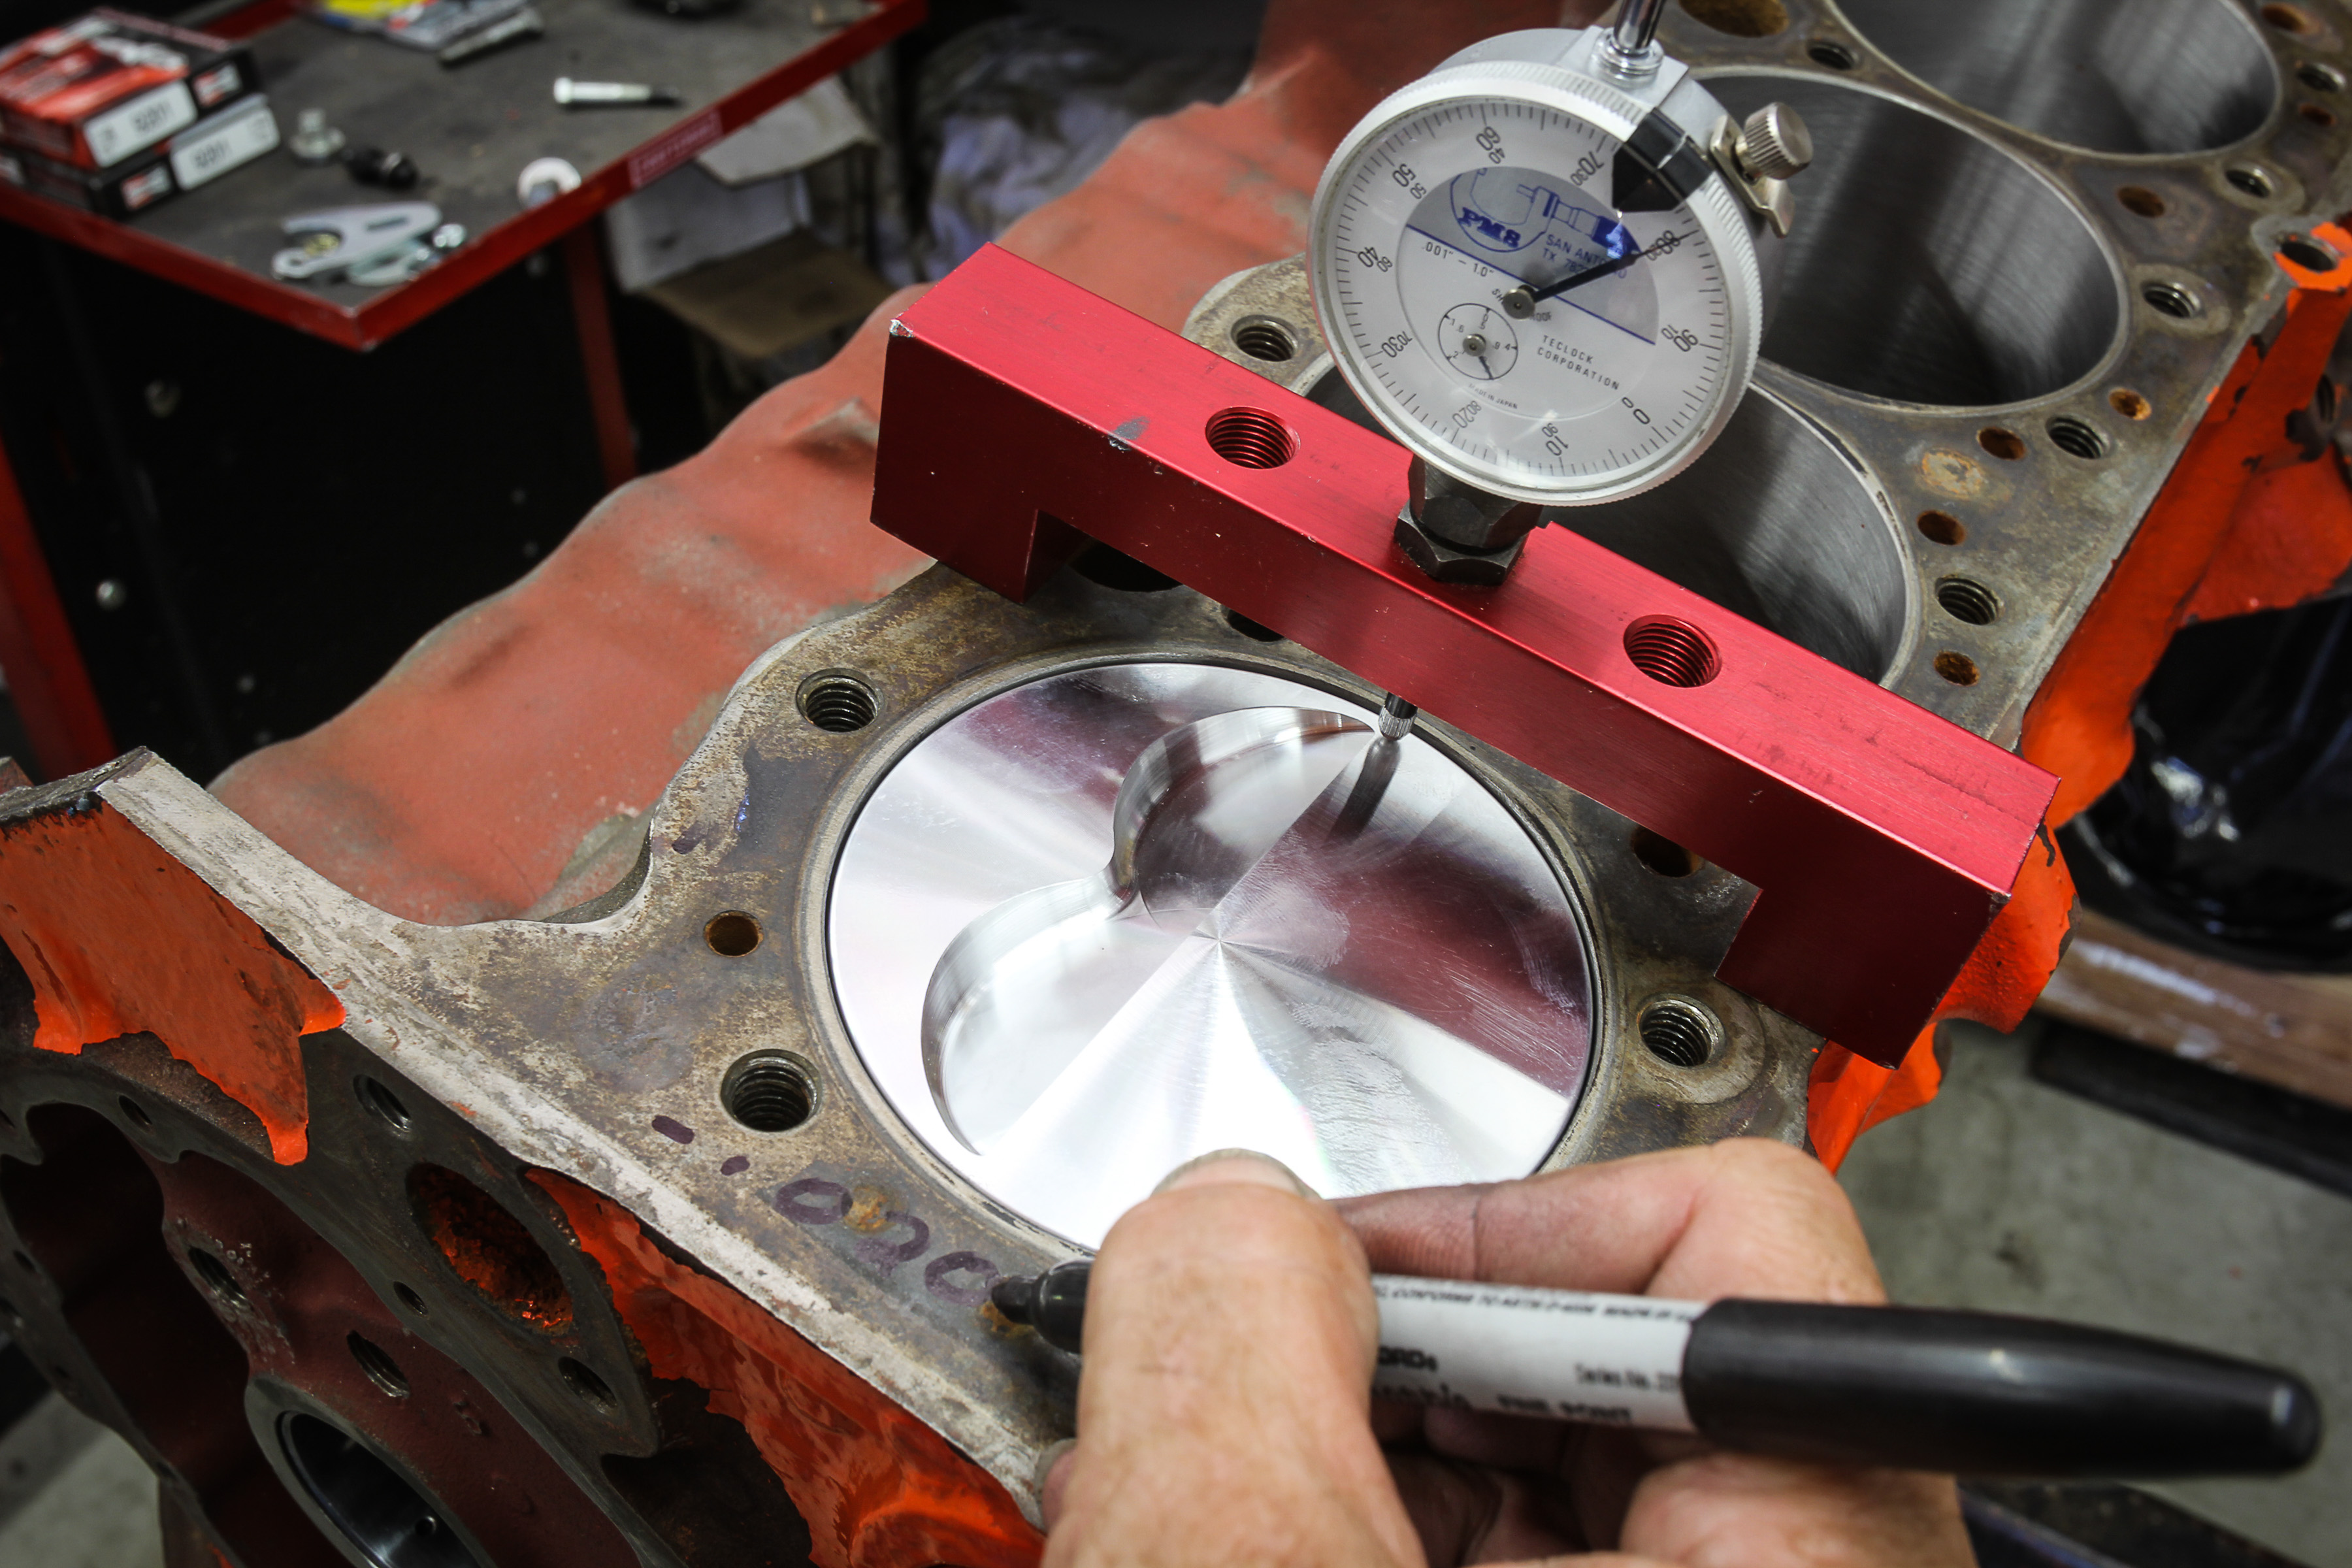
Measuring piston-to-deck clearance requires some finesse. While a depth micrometer will work, we prefer to use a deck bridge and a dial indicator placed both in line with the wrist pin and also at 90-degrees to the pin.
One essential tool that could be classified as an engine assembly tool is a rod bolt stretch gauge. This uses a heavy spring-loaded dial bore gauge mounted in a fixture that can be easily placed over a rod bolt to measure stretch as the rod bolt is tightened. This should be considered a required tool for any engine builder.
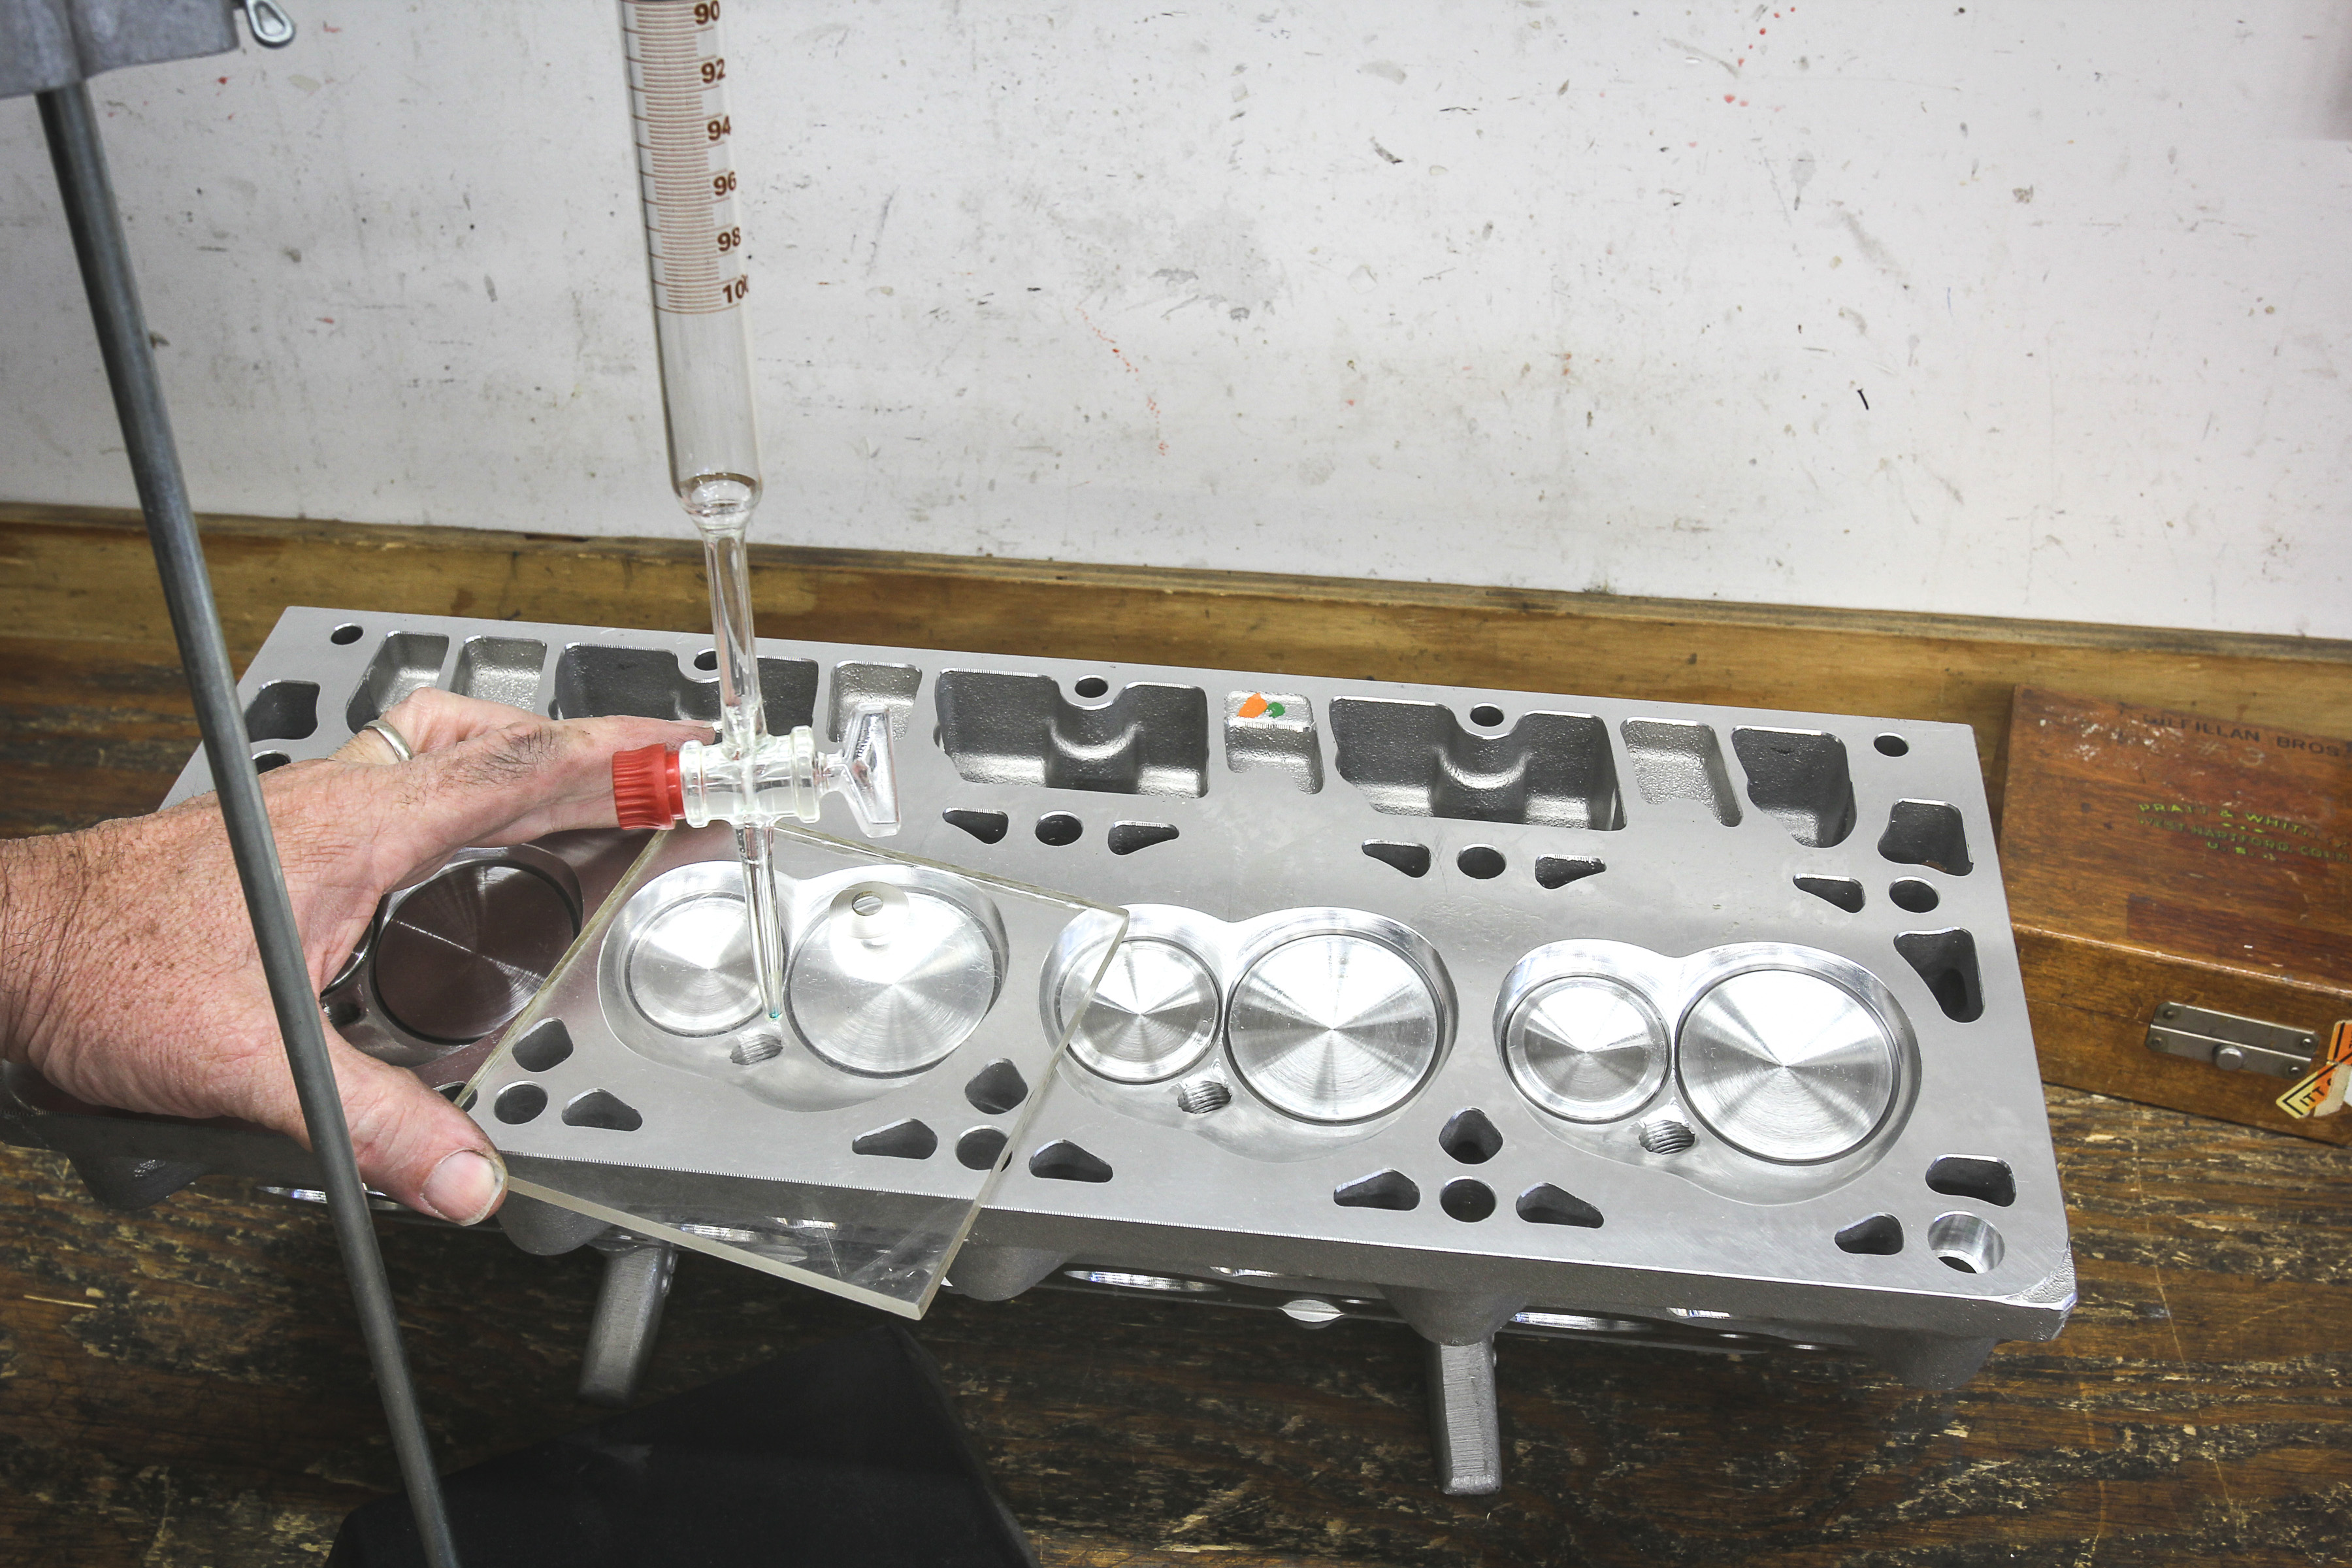
A 100ml burette is typically what is used for measuring combustion chamber volume in order to calculate compression ratio. One milliliter (ml) is equal to one cc, so you don’t have to worry about conversions.
Many enthusiasts don’t think much about the need to assemble cylinder heads but if you prefer to control your own destiny, any good engine builder would rather set his own specs. This will require a tool like a height micrometer. This is a vertical micrometer that fits over the valve guide and measures the distance between the valve spring seat and the bottom of the valve spring retainer. There are other ways to measure this dimension, but height mics are inexpensive and real time-savers.
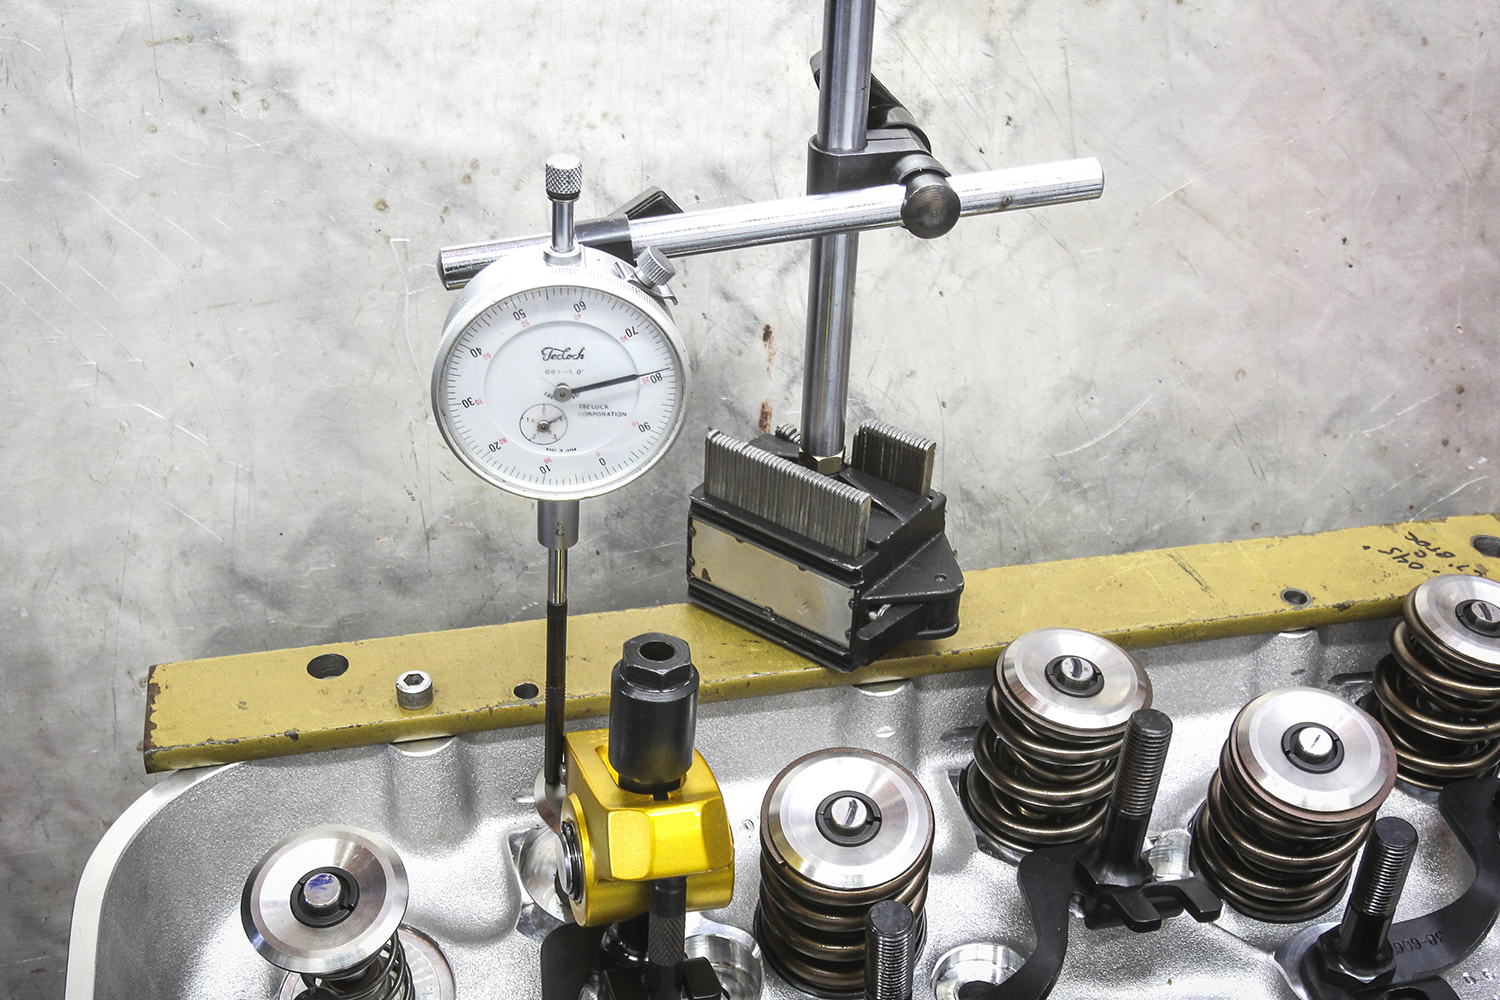
Besides our daily-use dial calipers, we probably use our dial indicator more often than any other measuring tool. There are dozens of uses for this handy device and most often used in conjunction with a magnetic base. We’re using a steel plate here to mount the magnetic base to an aluminum big-block head.
In order to calculate actual compression ratio, you will need to know the specific chamber volume, which means you will need a burette. There are less expensive versions, but for best accuracy, a glass burette with a heavy metal stand is the way to go. This can also be used to measure actual piston top volume in the engine. We’ll show how to do that in an upcoming article of the Blueprint Series.
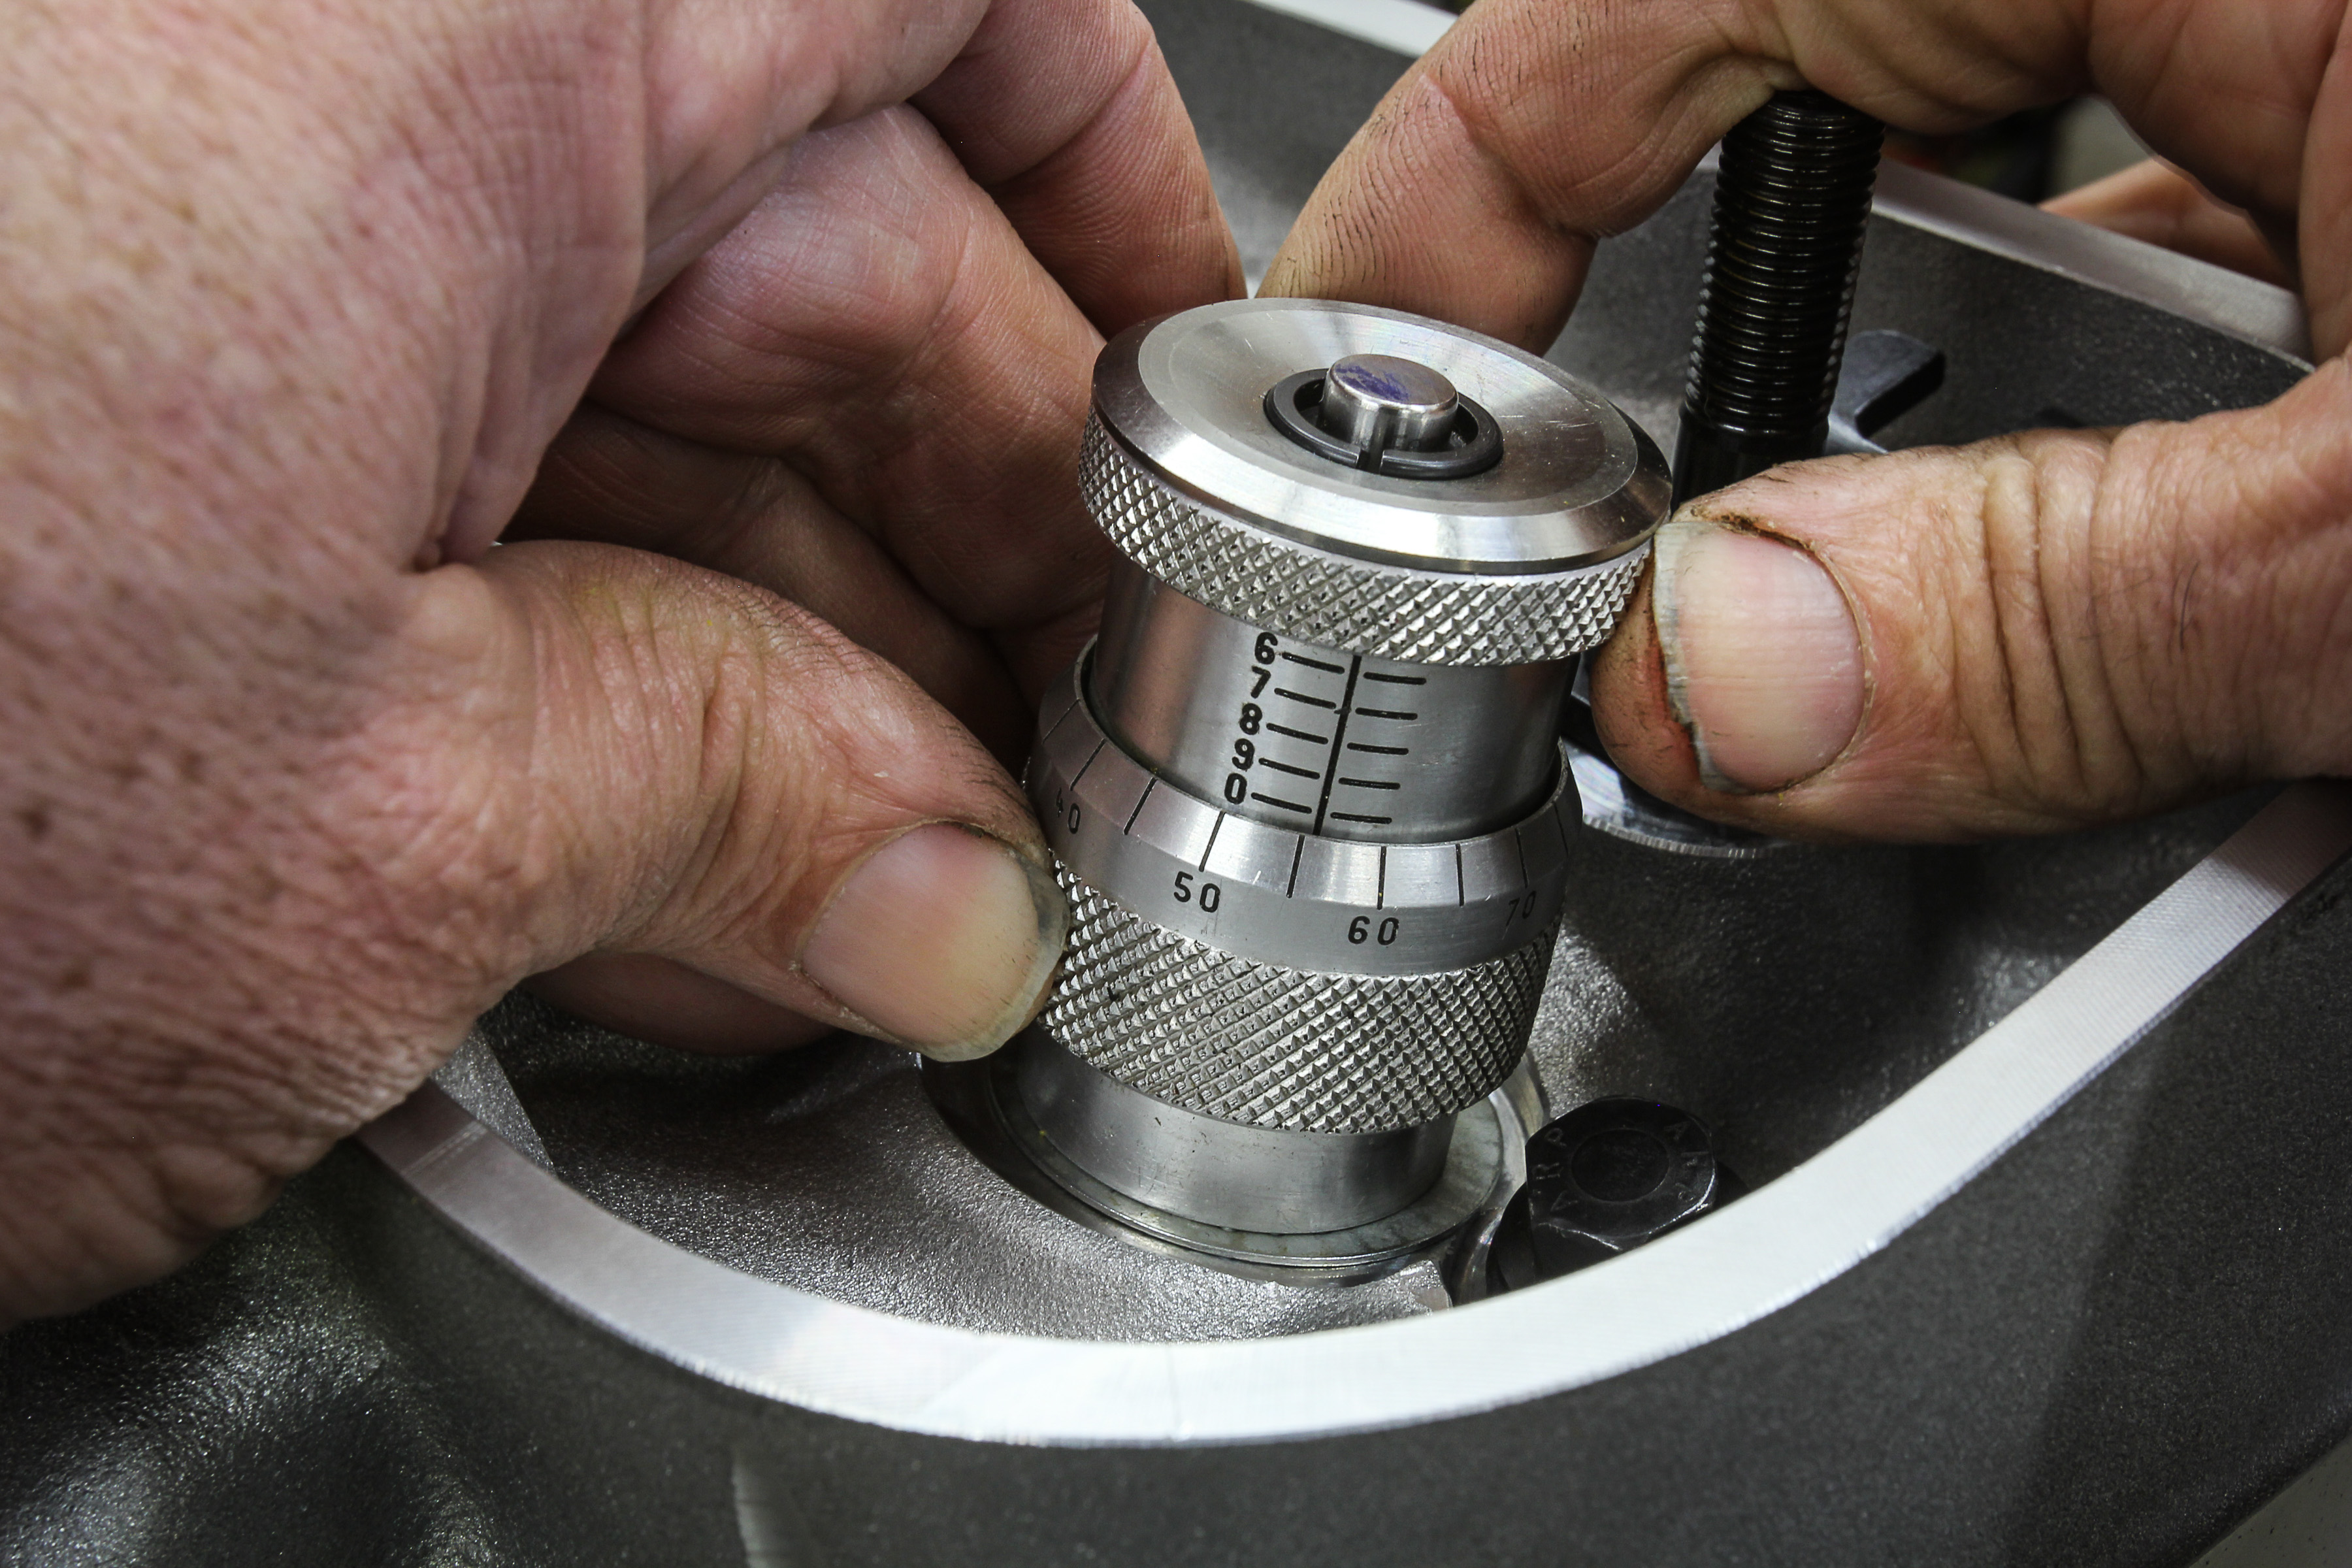
A height micrometer is a great tool for setting the installed height on valvesprings and makes this otherwise cumbersome job simple.
Assembly Tools
Our accompanying list is much longer for tools, but all serve a useful purpose. We won’t be able to describe them all, but there are several worth discussing here.
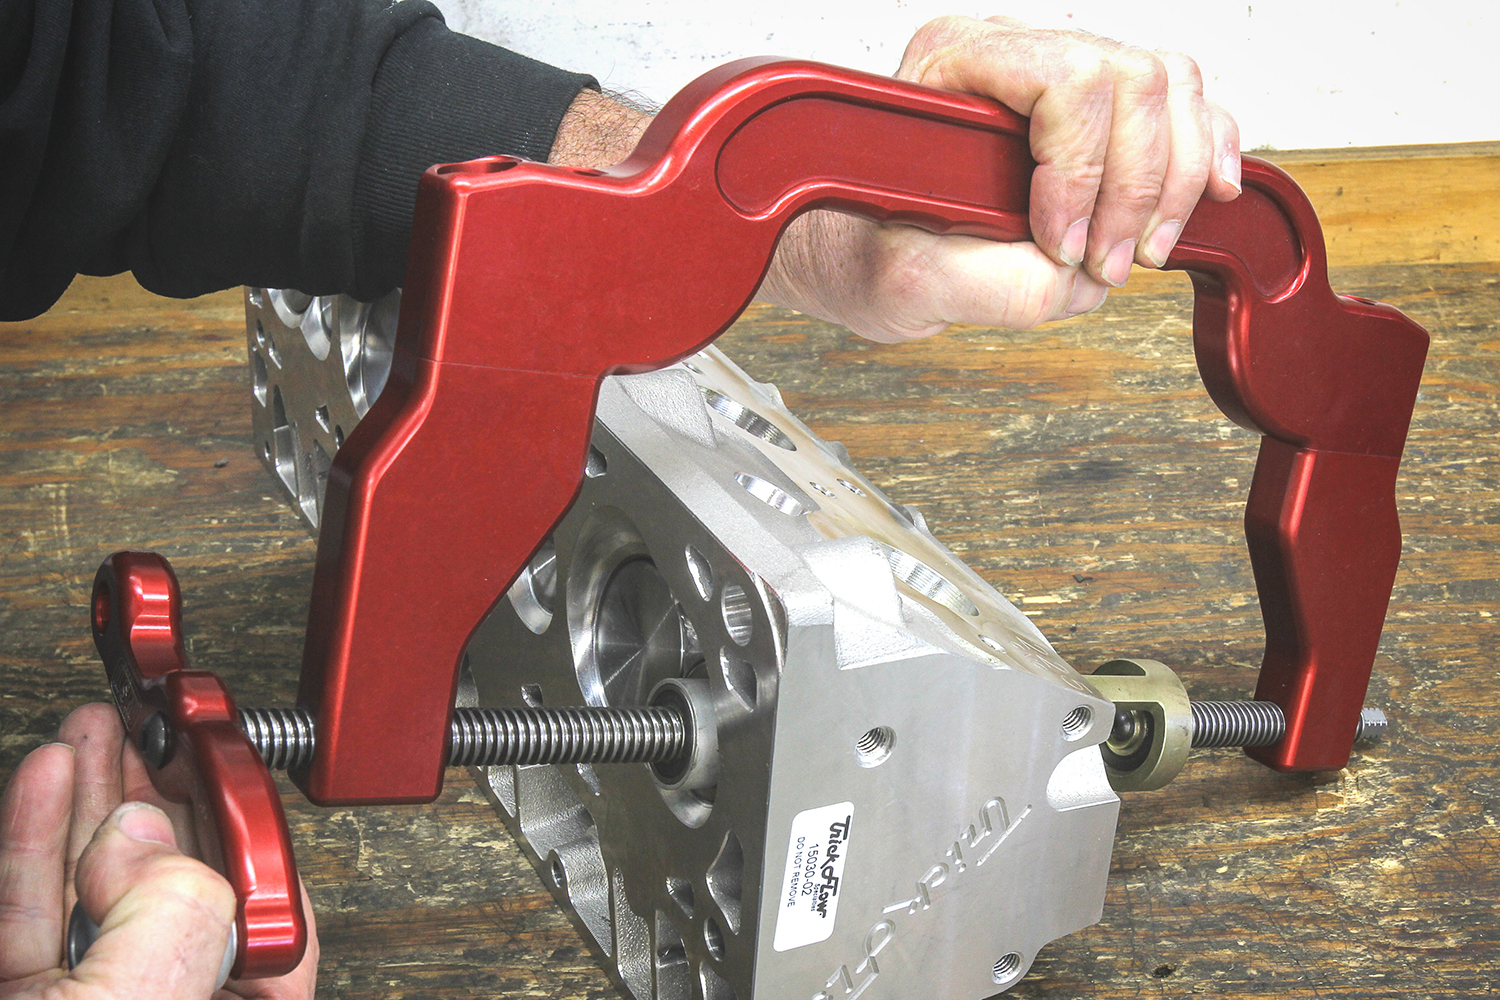
There are multiple versions of valvespring compressor tools aimed at removing springs with the heads on or off. We really like this manual off-engine compressor from LSM (SC-2000) not just for its snappy red anodizing but because it can handle heavy springs loads for mechanical-roller Rat motors! We also have an LSM tool for removing springs with the heads on the engine that works fantastically. Any car guy worth his lug nuts will own a quality torque wrench. There are seven in my tool box, which occupy their own drawer. Accuracy is important, but in a test performed using a highly accurate load machine at a local FAA certification shop, we discovered that a Harbor Freight torque wrench was really good among several clicker style wrenches tested. The key is to always return the setting to near zero after completing the task, since maintaining the load on the clicker spring eventually will hurt accuracy. The newer digital torque wrenches also appear to be useful although we have not tested these for accuracy.
Engine Assembly Tools
- Torque wrench – lb-ft and lb-in
- Torque angle gauge
- Piston deck height bridge
- Piston ring filer – manual or electric
- Piston ring squaring tool
- Piston stop (head off and head on)
- Tapered ring compressor—bore specific
- Balancer puller/installer
- Rod vise
- Crank gear install pipe (aluminum) homemade
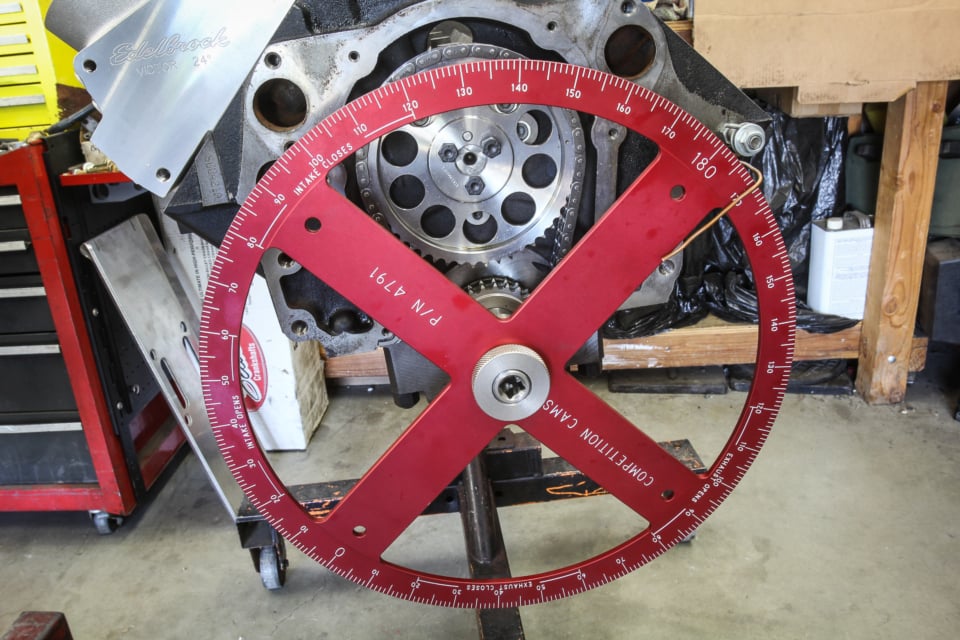
- Large diameter (professional) cam degree wheel / homemade indicators
- Homemade lifters – flat and roller for checking lifter movement
- Homemade SBC/BBC freeze plug install tool
- Homemade SBC/BBC preluber
- 100cc / 100ml burette and stand for measuring combustion chamber
- Plastic plate for measuring cc volume with domed pistons
- Modeling clay for checking valve-to-piston clearance
- Steel plate that bolts to aluminum head for mag base
- Crank nut / crank drive pieces
- Connecting rod chop sticks / rubber rod bolt covers
- LS lifter holding tool
- Valve checking springs
- Adjustable pushrods
- Valve spring removal tools
- Cam handle
- Feeler gauges—straight and angled
If you fancy yourself an engine builder, then you will be setting your own piston ring end gaps. This doesn’t demand a dedicated ring filer, as we know old-school guys who still use a hand file mounted in a vise. But for the rest of us, even a manual ring filer is a time-saver. The electric ones are really nice, but the good ones are rather expensive.

A rod bolt stretch gauge is an absolute must-have tool for building engines. We’ve seen too many examples of under-torqued rod bolts because a stretch gauge was not used.
You probably should not be building engines if you don’t own a cam degree wheel and the associated pieces. For years we used a small 8-inch diameter wheel, but the much larger professional wheels are far more accurate and easier to use. While those dedicated dial indicator lobe lift tools are handy, they’re not essential. We prefer using old lifters fitted with a dial indicator dimple on top to locate the plunger. These homemade tools work great and cost nothing.
Other related tools that you can make include a simple flat steel plate that bolts to the block deck for setting TDC when degreeing the cam. There are aftermarket parts out there that look prettier, but in terms of getting the job done, if you can drill a couple of holes in a quarter-inch steel plate, you can accomplish the same task for a near-zero investment.
Gauge blocks are not essential, unless you are interested in the most accurate readings from your outside micrometer or dial bore gauge. The numbers on the tape refer to their overall length variation in millionths of an inch at 68 degrees F.
Crank nuts are essential for turning the engine over while degreeing the cam or installing pistons. A crank bolt will work, but they generally loosen when trying to turn the engine backwards. Plus, you’ll need a specific crank fixture to mount your degree wheel. We like the ones that fit over the crank and use a large thumbwheel to lock the degree wheel in place. Be sure to get one with an outside diameter (o.d.) that matches your degree wheel. Other valvetrain related tools include a cam handle, checking springs, and adjustable pushrods which allow you to establish the proper pushrod length.
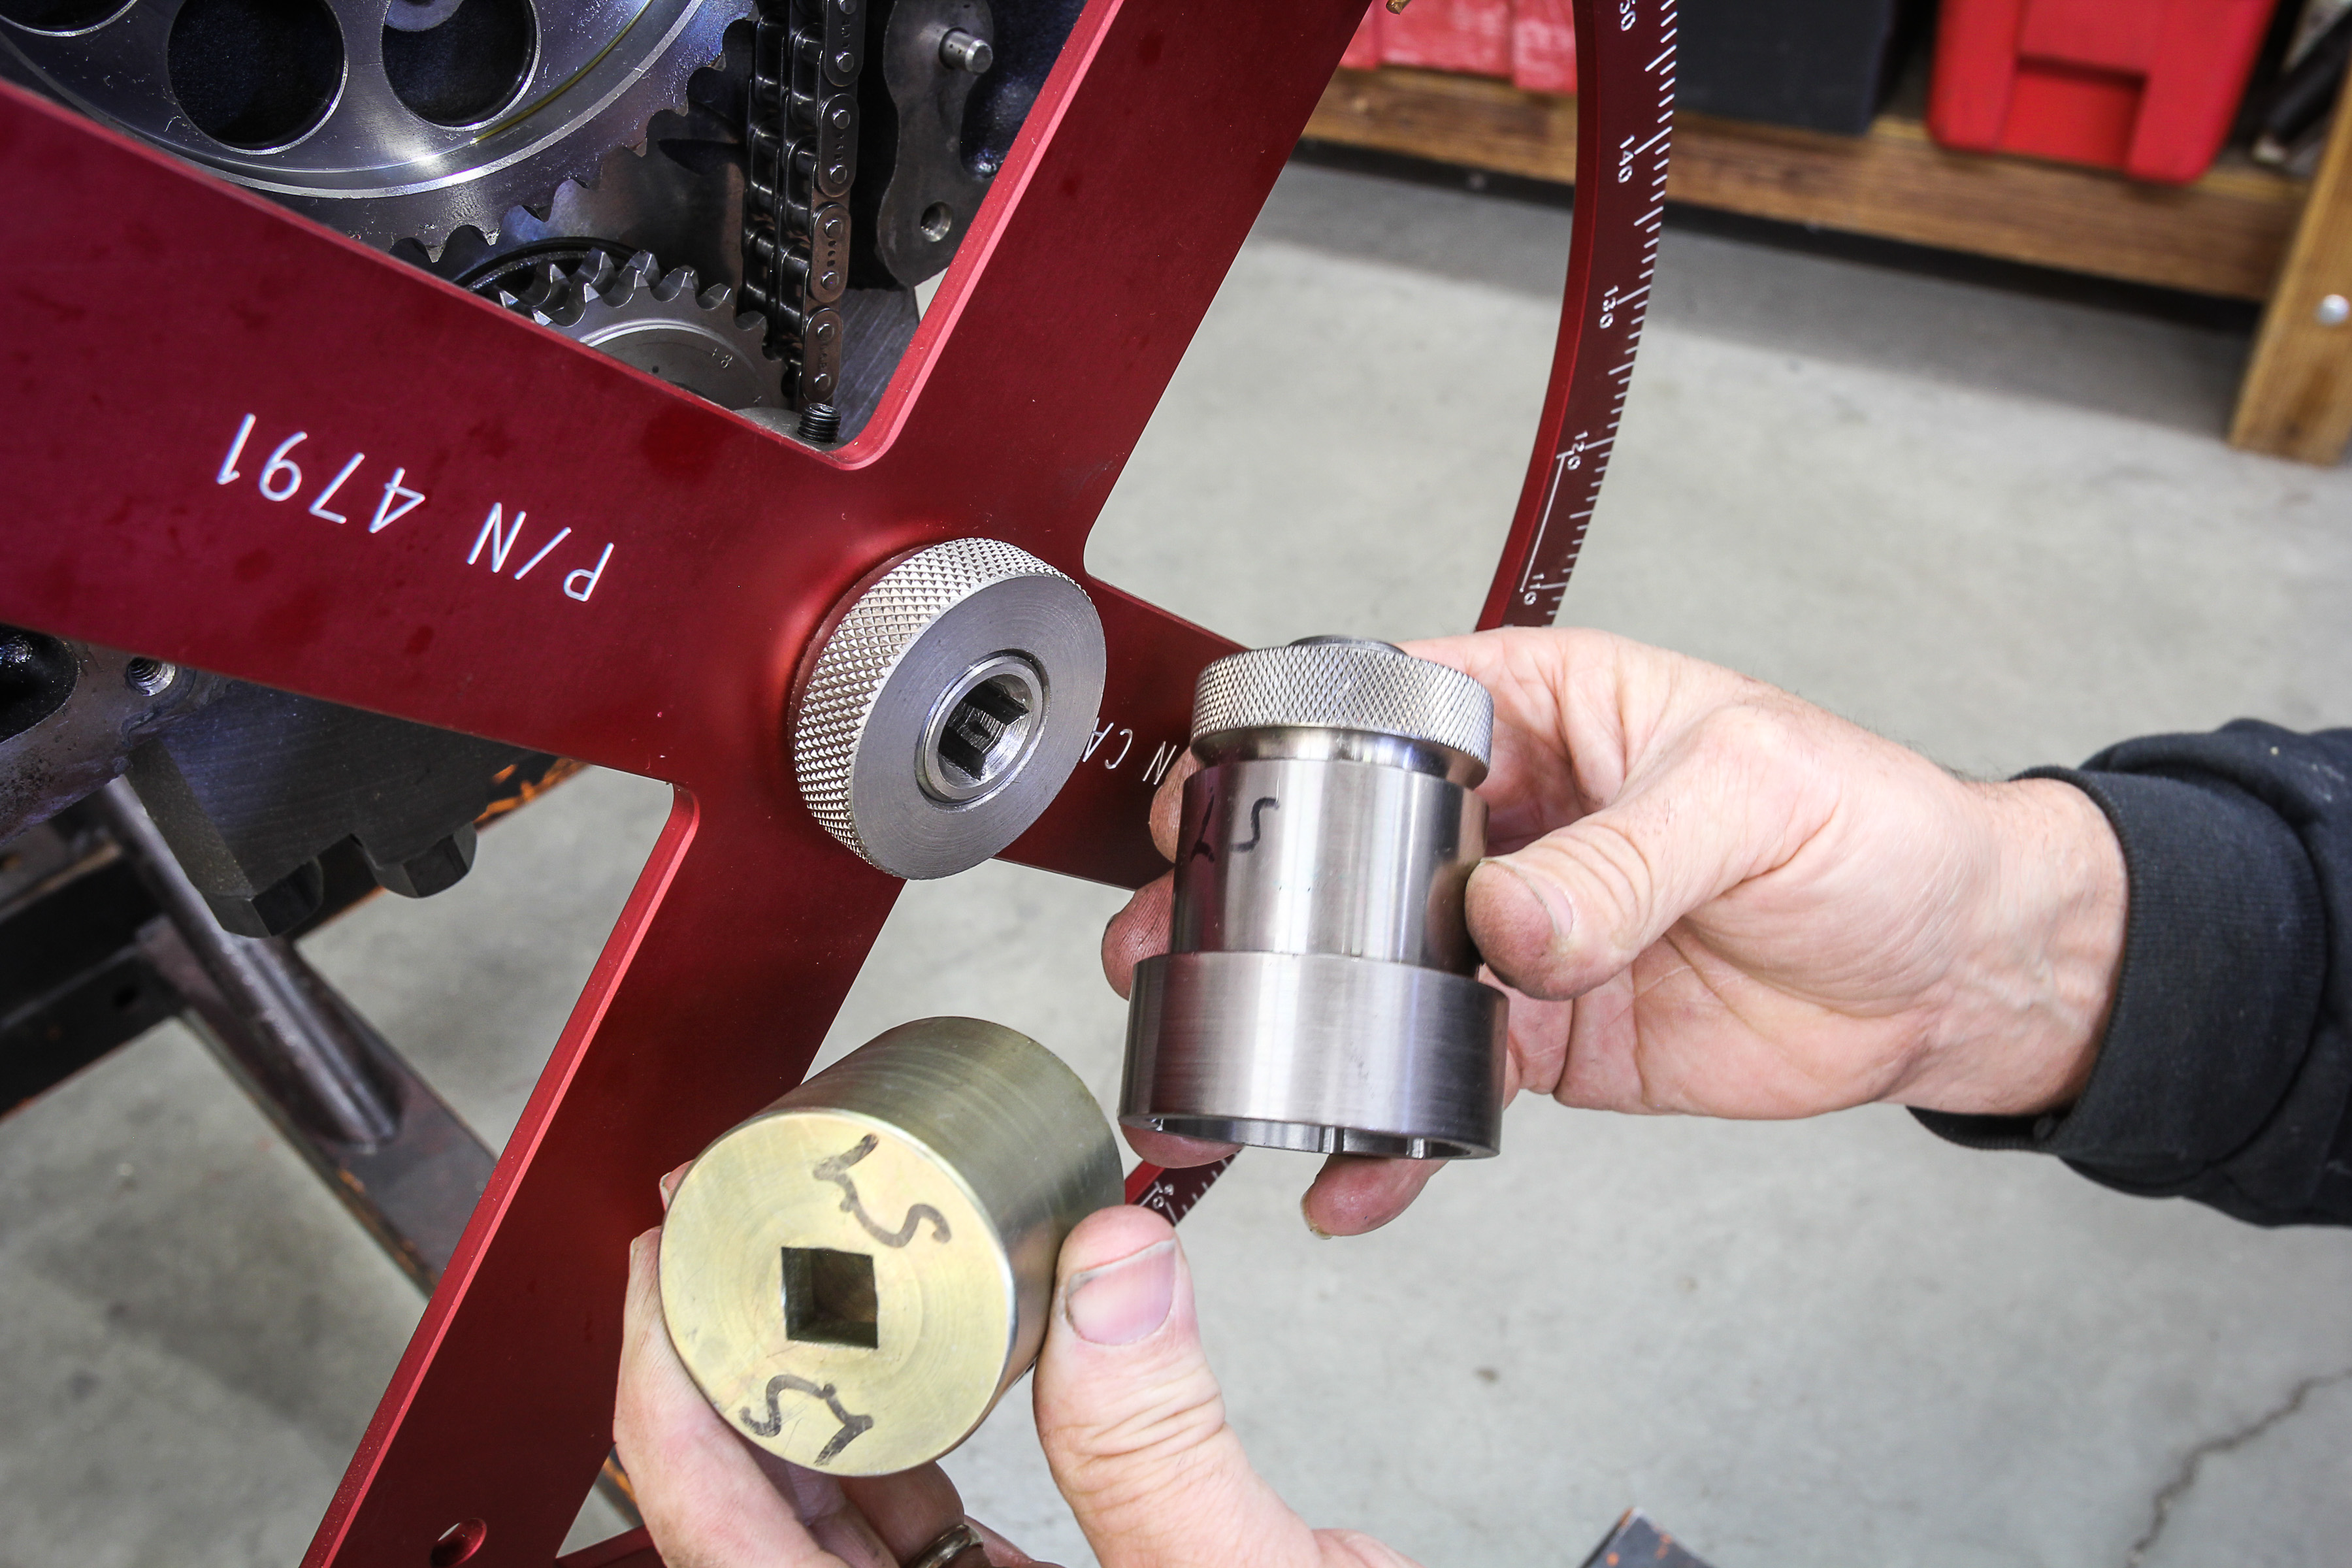
An extremely handy tool for almost any work even beyond blueprinting is a crank nut or crank turning tool that fits over the crank snout.
In Conclusion
This overview has probably missed a tool or two – most of these are very specific-use items. As an example, we had our friendly neighborhood machinist make up a small- and big-block Chevy brass freeze plug driver tool immediately after losing a freeze plug on the dyno because it was installed incorrectly.
If you notice a tool you think would be useful, add a comment and help everyone with your experience. Think of this as crowd-sourcing for engine builders. Stay tuned for more from the Blueprint Series to come!


