


With the hard part done, it’s now time to start planning the layout and lighting of the new EngineLabs shop space. This is incredibly important since we’re working in such a limited space. The key to living with a small shop space is planning out how each square foot will be utilized ahead of time, so that you can arrange and rearrange things, virtually, instead of in the real world.
There are a lot of you who probably have a two-car garage and wish you had more space. The building we’re working out of is slightly smaller than the average single-car garage. So, not only is this attainable for almost anyone — even someone living in an apartment or condo — it’s an exercise in working with what you have. So we’re going to walk you through the tools we’ve used in order to get things right the first time.
Prior Planning Prevents Poor Performance
We’ve come a long way from a drafting square and large pads of graph paper. These days there are all sorts of room planning tools that can be adapted to a workshop space. For us, we started in a less-than-traditional route. Since we’re familiar with the Adobe Creative Suite of products, we started in Illustrator, where we were able to convert inches into pixels (1 inch = 10 pixels, to be exact), and create a 2D model of the shop floorplan and all of the benches and machines that would be filling the space.
Since we were working with a lot of existing components, as opposed to “furnishing” the new shop from scratch, we had quite a few limitations. Being able to arrange and rearrange the shop’s layout over and over, digitally, was incredibly helpful. Once we had a layout we were satisfied with, we opted to create a 3D model of the workspace. Using SketchUp Free, we were able to create an admittedly simple 3D model of the shop’s interior, along with all of the benches, mills, cabinets, and other components to get a virtual layout of the furnished shop.


While this might seem like a lot of extra work, in reality, it made the whole thing go much easier. When it was time for the actual heavy lifting, there was a solid plan of where to put what, how things would line up, and how everything would fit together. It was like putting together a Lego set with instructions, instead of trying to build something out of popsicle sticks, winging it the whole way.
Lighting Layout
One thing that a lot of people really struggle with is proper lighting. Your eyes are pretty poor judges of how much light is actually available in a space. This is because they will constantly adjust to the available light level. While you might think you are able to see OK, when you have to read something small, or complete an extra-fine motor task, you’ll realize that you don’t have enough light.
Since this all sounds subjective, and we much prefer objective, quantifiable measurements, we found some lighting standards and guidelines for different scenarios. For a workshop of this type, the absolute bare minimum amount of acceptable light is 75 foot-candles (lumens per square foot) or 750 lux (lumens per square meter), with some recommendations as high as 200 foot-candles (Home Depot even goes so far as to say 300 lumens per square foot, but they are also trying to sell you lighting).
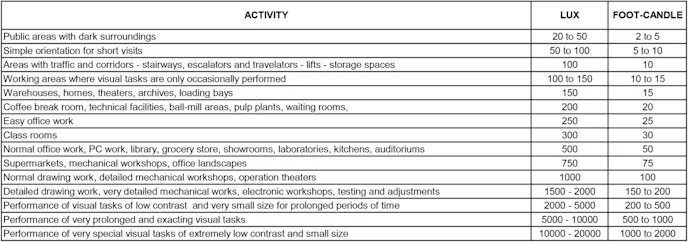
If we run the numbers on how the space was lit before the remodel, we were at right around 113 foot-candles, so we’d like to keep at least that level of lighting, if not increase it. Leaning on our photography background, we know that we’d like to add at least 2/3rd of a stop of light for shooting — that’s a 66-percent increase. There are currently six daylight (5,000K color temperature) LED tubes in the shop, each rated at 2,200 lumens of output.
Since cheap LEDs almost never put out the advertised amount of light, we’ll assume 75 percent of that number to be their actual output. If we add 10 more tubes (for 16 total), add up their lumen output, and divide by the new square footage of the shop, we come in at 205 foot-candles. Since that might be great for the camera but a little harsh on our eyes all day, every day, we’re wiring half of the lights to an auxiliary switch so we can sit at about 100 foot-candles when the cameras aren’t around.
The Color of the Walls
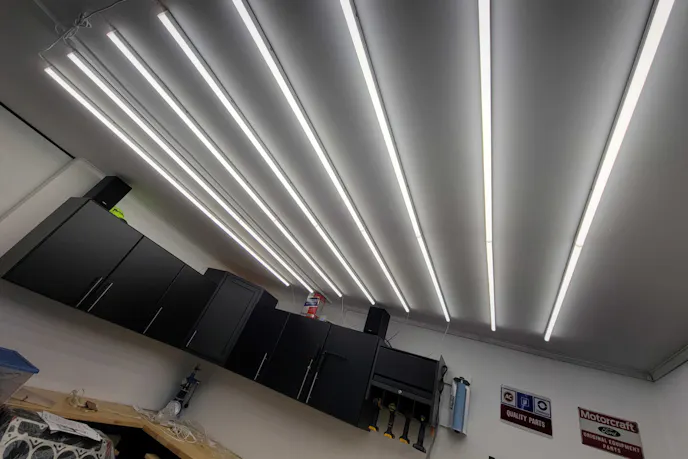
While room color is often a purely aesthetic choice, we chose this paint color for a very specific, very functional reason. Not only does white reflect the most amount of light, but it’s also a neutral color. I’m sure we’ve all groaned when anyone talks about Eggshell vs. Cloud White vs. Artic Mist — they are all white, right? Well, there is some validity to that discussion. Since this space is going to be used for photos and video, we needed to find a white that is genuinely neutral and won’t cause the white balance to freak out. A cool white can have blue undertones, while a warm white can have small amounts of yellow or red in it.
After an absurd amount of research, we found that our options were to spend a ridiculous amount of money on a proper photo-white paint, or to go with what several photography blogs ranked as the best bang for the buck white – This Behr Ultra Pure White paint. On paper, it might be giving up a few points on brightness and it might not be perfectly color-free under a high-power spectrometer, but at way less than half the cost of specialty paint, it does the job 99.5-percent as well. And, it’s on the shelf at the local hardware store.
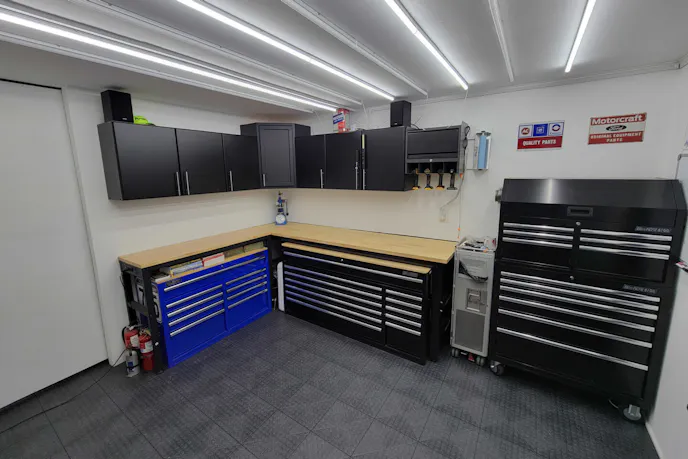
If the primary goal for the shop wasn’t shooting photos and video, we likely would have made different choices on colors. In that same vein, the next aesthetic decision to be made was one of appearance. If you’ve read our newsletter, you know that I’m a fan of Adam Savage’s theory on orders of retrievability. While some might consider having tools out on the wall, always visible and easily accessible to look cluttered, that would be my first choice. In fact, when I was at KPE Racing, I felt quite at home in the engine assembly room with all the tools out and easily reachable.
However, this room serves multiple purposes. It’s not just an engine assembly room. It’s also a photography studio and a videography studio. So, that means that my preference of having everything out and accessible all the time will need to take a back seat to a neat and tidy aesthetic with things hidden away in cabinets and drawers. I think we’ve achieved that here.
The bulk of the shop remodel is done. I’ve got new floors, new walls, new paint, new cabinets, and new lighting. The main room is now functional again, although I still have some work to do over on the other side to get the CNC engraver set back up and reorganize the shelving a little more. I have to make room for several new projects we’ll be discussing soon, and we still have some fun shop infrastructure projects to share with you, but for now, I can get back to work doing what the shop was designed for.
You might also like
Performance Engine Camshafts: How Lift And Duration Affect Horsepower
Few things influence engine performance as much cam lift and duration. Take a look at a few points to consider before your next build

